Dashboard variables
Introduced 3.7
Dashboard variables are reusable values that you can reference in visualization editor queries. Use variables for filters, metrics, dimensions, intervals, fields, aggregations, and any other query parameter, eliminating the need to manually edit PPL or PromQL queries when switching between data views.
Dashboard variables are available in Observability workspaces only. To use dashboard variables, create an Observability workspace if you don’t already have one. For more information, see Workspace for OpenSearch Dashboards.
Use dashboard variables to:
- Change query parameters without editing visualizations.
- Define values once and reference them across multiple visualizations.
- Automatically update visualizations when variable values change.
- Create cascading filters with dependent variables.
- Dynamically control grouping, aggregation, and time intervals.
Variable types
OpenSearch Dashboards supports the following variable types:
-
Query variables: Options are dynamically fetched from a data source using a Piped Processing Language (PPL) or Prometheus Query Language (PromQL) query. Use query variables when values change over time or depend on underlying data, such as service names from logs or available regions from metrics. For a Prometheus data connection, you can build the query from PromQL query types (label names, label values, metrics, or series) instead of writing a raw query. For more information, see Using a PromQL query variable.
-
Custom variables: Options are manually defined as a static list. Use custom variables for predefined categories like environment types (
dev,staging,prod) or fixed status codes. -
Text variables: A single value that you type in the variables bar. Use text variables for values that you can’t list in advance, such as a search term or a threshold.
Variable syntax
You can reference variables in queries using $variableName or ${variableName} syntax:
source=logs | where service='${service}' | stats count() by region
When you change a variable’s value in a dashboard, all visualizations referencing that variable automatically refresh using the new value.
Enabling dashboard variables
In addition to enabling workspaces, add the following setting to your opensearch_dashboards.yml file:
explore.enabled: true
Restart OpenSearch Dashboards for the changes to take effect.
Creating and using dashboard variables
The following tutorial uses the OpenSearch Dashboards sample web logs dataset to create a variable and use it in a visualization.
Step 1: Create a workspace
- Navigate to the OpenSearch Dashboards home page.
- Select Create workspace.
- Enter a workspace name (for example,
My Observability). - In the Use case and features section, keep Observability selected.
- Select Create workspace.
For more information, see Create a workspace.
Step 2: Set up sample data
In the workspace, navigate to Manage workspace > Sample data and select Add data for the web logs dataset. Adding the sample data also creates the opensearch_dashboards_sample_data_logs index pattern.
Step 3: Create a variable
- Select Dashboards in the left navigation.
- Select Create Dashboard.
- Save the dashboard by entering a title (for example,
Log Analysis) and selecting Save. Saving switches the dashboard to view mode. - Turn on the Edit toggle.
- At the top of the dashboard, select Add variable.
- In the Name field, enter
extension. - In the Type dropdown, keep Query selected.
- In the Query options section, select Open variable editor.
- Keep the query language set to PPL. Verify that the selected dataset is
opensearch_dashboards_sample_data_logs. To choose a different dataset, select the dataset name. -
Enter the following query:
source=opensearch_dashboards_sample_data_logs | stats count() by extension | fields extension - To verify the results, select Preview. The preview displays
css,deb,gz,rpm,zip, and an empty value for documents that have no file extension. - In the Value field dropdown, verify that
extensionis selected. The preview fills in this field automatically. - Select Apply to save the query and close the editor.
- Select Add variable to save.
The extension variable now appears at the top of the dashboard with a dropdown.
For more information, see Managing dashboard variables.
Step 4: Use the variable in a visualization
- In the dashboard, select Create new.
- Select Add visualization to open the visualization editor.
-
In the query editor, enter the following PPL query that references the
$extensionvariable:| where extension='$extension' | stats count() by response - In the
extensiondropdown at the top of the editor, select a value (for example,css). - Select Update to run the query.
The visualization displays the response code distribution filtered by the selected extension, as shown in the following image.
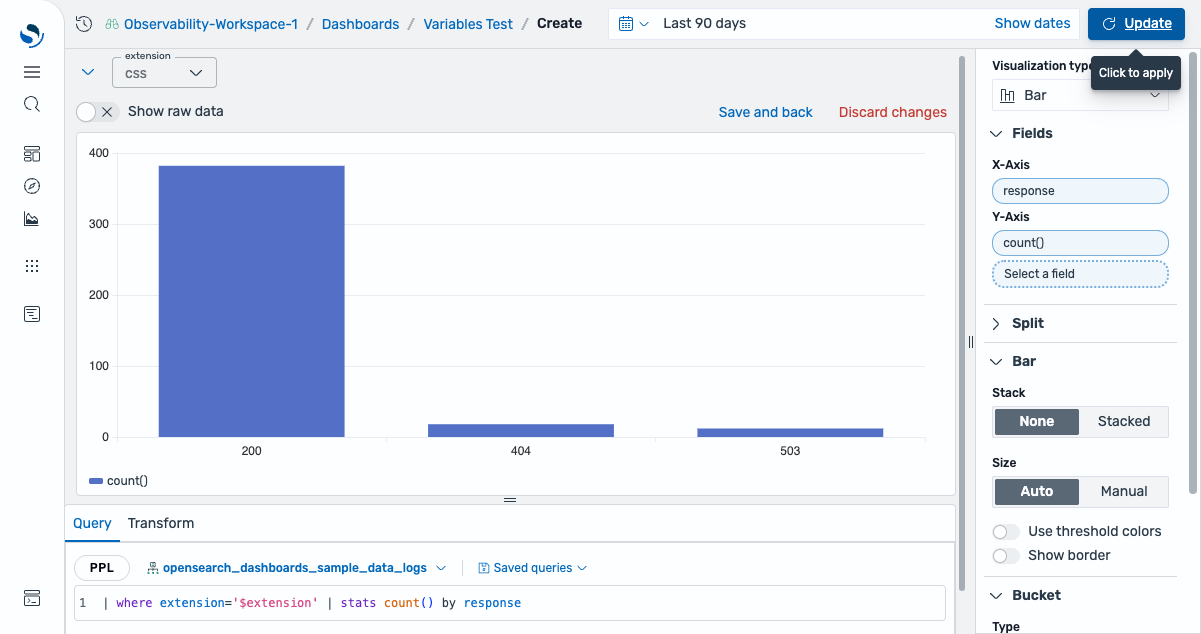
When you change the extension value in the dropdown, the visualization automatically updates to reflect the new selection.
If no results appear, expand the time range (for example, Last 90 days) using the time filter in the upper-right corner.
For more information, see Using dashboard variables.
Variable storage
Variables are stored as part of the dashboard saved object in OpenSearch. Each dashboard maintains its own set of variables independently.
The variablesJSON attribute in the dashboard saved object contains the variable configurations:
{
  type: "dashboard",
  id: "dashboard-id",
  attributes: {
    title: "My Dashboard",
    variablesJSON: "{\"variables\":[...]}"
  }
}
Variable configurations include the following components:
- Metadata (name, label, description, type).
- Options (query definition for query type or custom values for custom type).
- Settings (multi-select, “All” option, sort order, visibility).
- Current values (selected values for each variable).
Current variable values are also synchronized to the dashboard URL so that you can:
- Share dashboards with specific filter values preselected.
- Bookmark dashboards with desired variable states.
- Persist variable selections across page refreshes.
Related documentation
- Managing dashboard variables
- Using dashboard variables
- Creating visualizations using queries
- Workspace for OpenSearch Dashboards