Managing dashboard variables
You can create, edit, delete, organize, and view dashboard variables from within a dashboard.
Prerequisites
Before you start, ensure that you have met the following prerequisites:
- Dashboard variables are enabled in your
opensearch_dashboards.ymlfile. - You have an Observability workspace set up.
For the complete setup, see Creating and using dashboard variables.
Creating a query variable
Use a query variable when the list of available values is retrieved from a data source. For example, you can create an extension variable from the sample web logs data and use it to filter multiple visualizations by file extension.
The following example uses the OpenSearch Dashboards sample web logs data. If you use a different dataset, select the dataset and fields that match your data.
To create a query variable, follow these steps:
- In your Observability workspace, select Dashboards in the left navigation.
- Open an existing dashboard or select Create Dashboard to create a new dashboard. If you create a new dashboard, save it first by entering a title and selecting Save.
- If the dashboard is in view mode, turn on the Edit toggle.
- At the top of the dashboard, select Add variable.
- Configure the following general settings:
- Name: Enter
extension. This is the identifier used to reference the variable in queries, for example,$extensionor${extension}. - Label: Enter
Extension. This is the display name shown at the top of the dashboard. - Description: Optionally, enter a description, such as
Filters visualizations by file extension. - Type: Keep Query selected.
- Name: Enter
- In the Query options section, select Open variable editor. The query editor opens in a modal with a pinned Preview of values panel.
- Keep the query language set to PPL. To build the query from Prometheus metadata instead, see Using a PromQL query variable.
- Verify that the selected dataset is
opensearch_dashboards_sample_data_logs. To choose a different dataset, select the dataset name. -
Enter the following query:
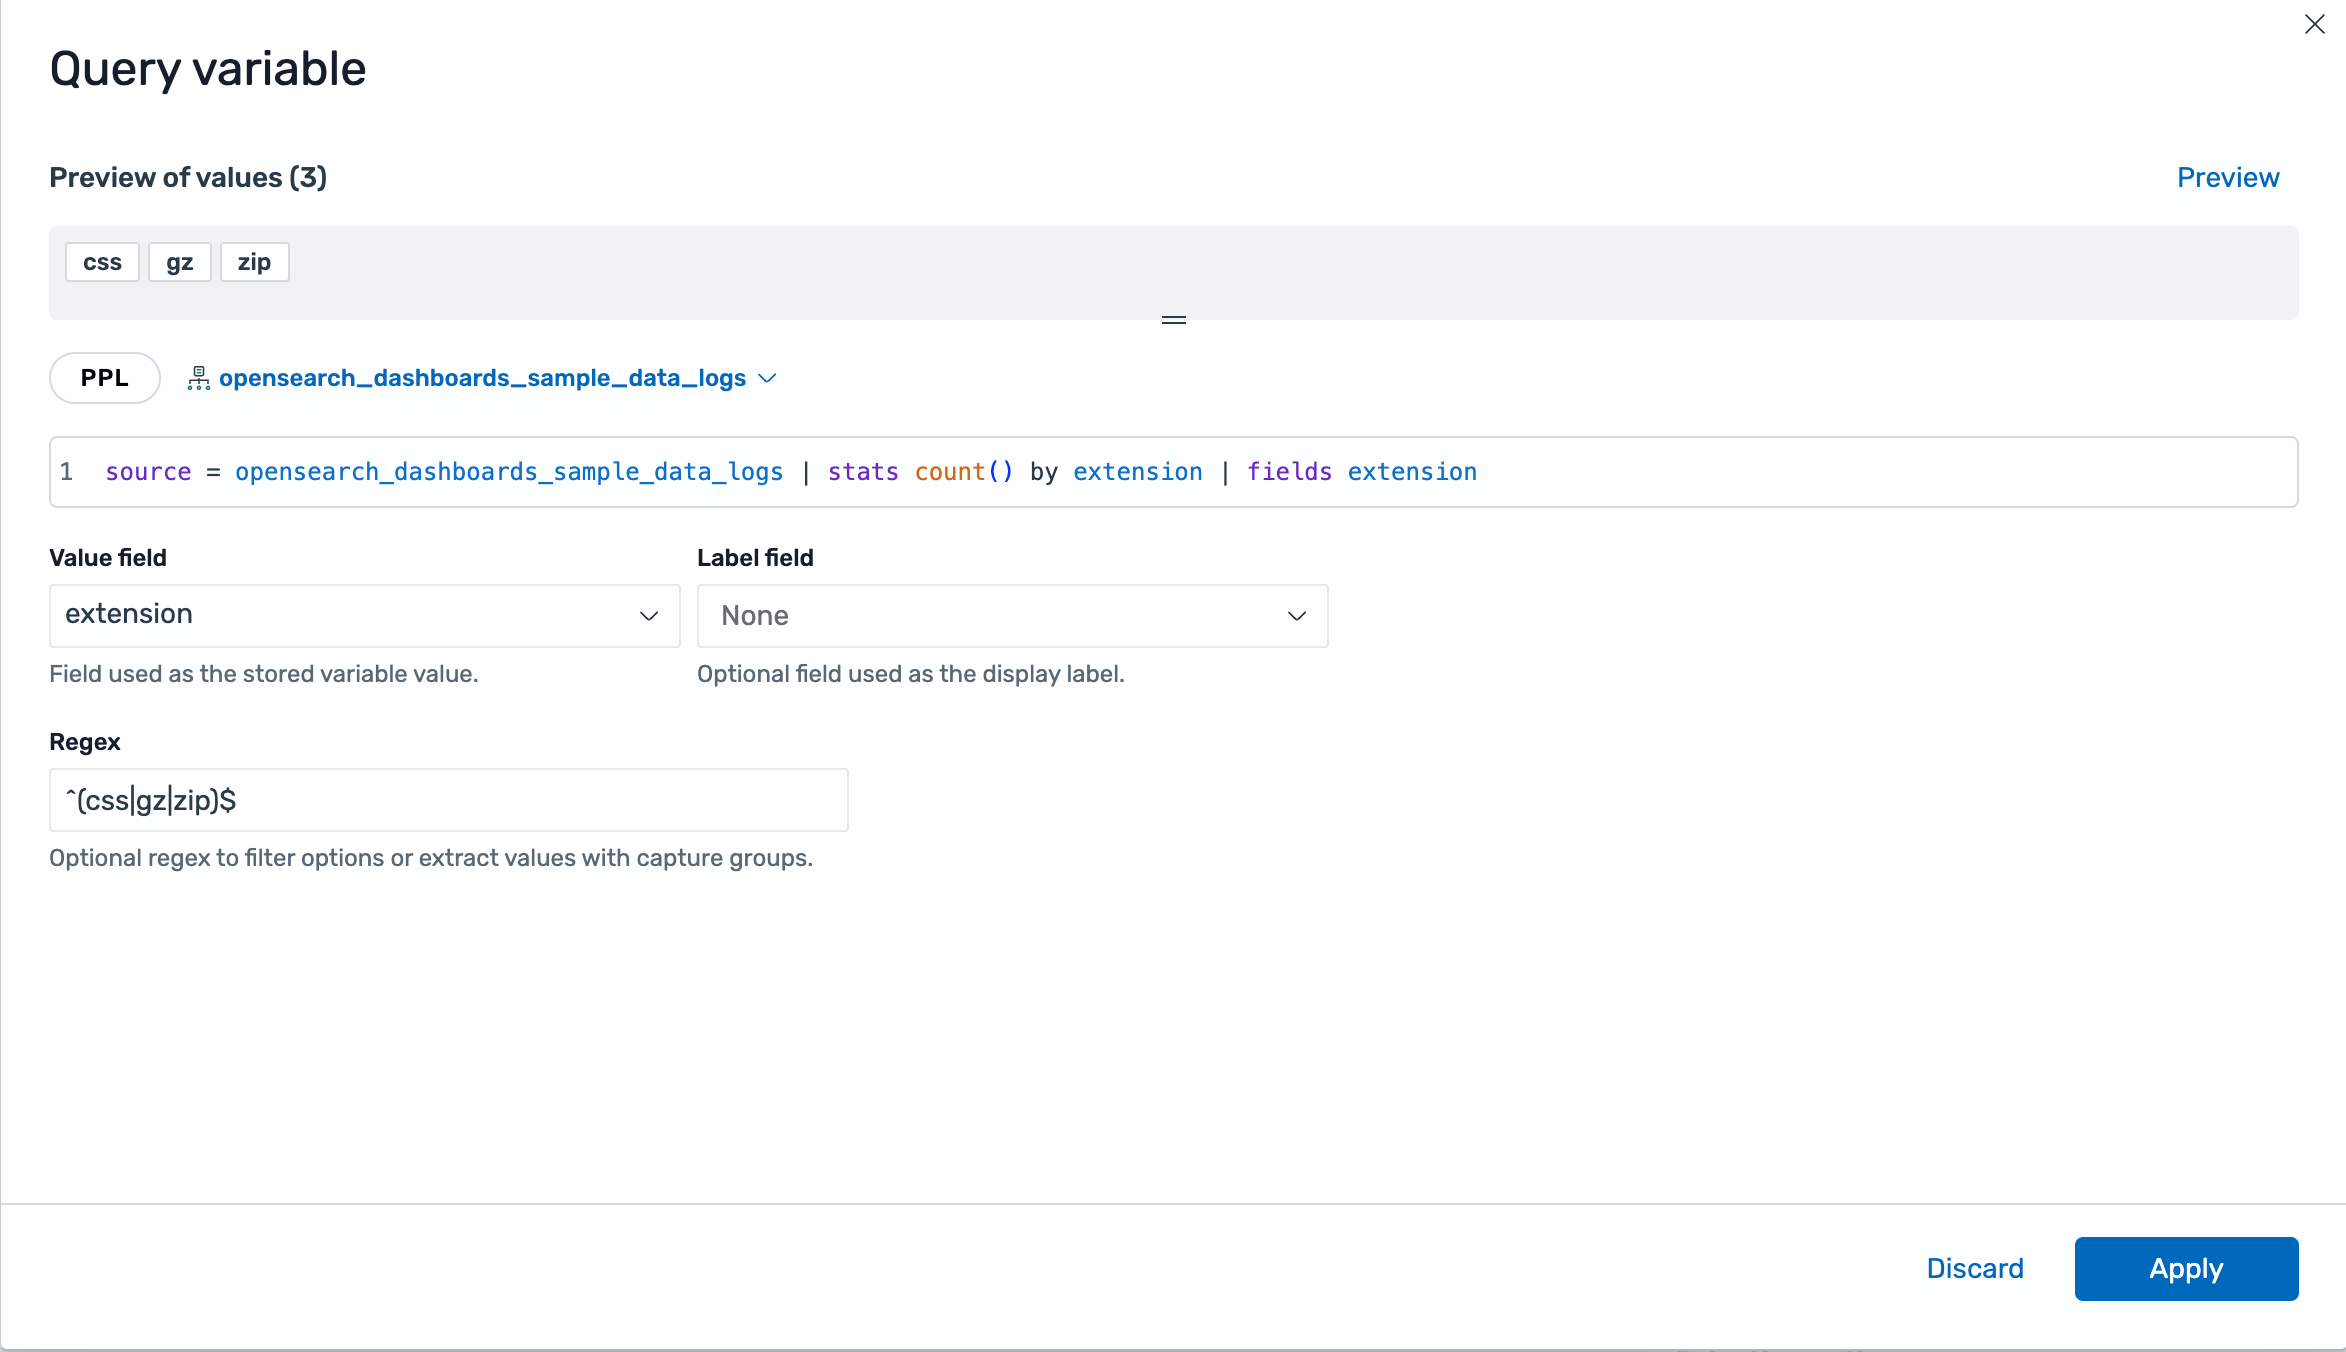
source = opensearch_dashboards_sample_data_logs | stats count() by extension | fields extension - Select Preview. The preview runs the query and displays the first 100 variable options in the Preview of values panel. You must successfully preview a query variable before you can apply it.
- In the Value field dropdown, verify that
extensionis selected. The preview fills in this field automatically. The value field provides the value inserted into queries when you use$extensionor${extension}. - In the Label field dropdown, keep None. Select a label field only when the query returns a separate field to display in the dropdown list in place of the stored value.
- Optional: In Regex, enter a regular expression to filter the available options or to extract values and labels from the query results. For example,
^(css|gz|zip)$displays only thecss,gz, andzipoptions. The preview updates to show the filtered options. For more information, see Filtering and extracting options with a regular expression. - Select Apply to save the query and close the editor.
- Back in the variable editor, in the Query options section, select a Refresh option to choose when OpenSearch Dashboards updates the variable options:
- On dashboard load (default): Refreshes options when the dashboard loads.
- On time range change: Refreshes options when the dashboard time range changes. Use this option when the available values depend on the selected time range.
- Configure the settings in the Selection options section. For more information, see Configuring variable option settings.
- Select Add variable.
The variable appears at the top of the dashboard. The following image shows the query editor for an extension query variable configured using the sample web logs data.
Mapping query result fields
A query variable can use one field as the stored value and another field as the display label:
- Value field: The field used as the variable value. OpenSearch Dashboards inserts this value into queries when you reference the variable.
- Label field: An optional field used as the display label in the variable dropdown list. The label does not change the value inserted into queries.
For example, if your query returns service_id and service_name, set Value field to service_id and Label field to service_name. The dropdown list displays the service name, and queries receive the service ID.
If you do not select a value field, OpenSearch Dashboards uses the first field returned by the query. To avoid unexpected values, preview the query and explicitly select the field to use as the variable value.
Using a PromQL query variable
When a query variable uses a dataset backed by a Prometheus data connection, you can set the query language to PromQL. Instead of writing a raw query, you build the variable from one of the following PromQL query types:
- Label names: Lists the label names in the data. You can optionally scope the result to a metric.
- Label values: Lists the values of a label that you choose. You can narrow the result with label matchers (
=,!=,=~, and!~) and select a metric from the Metrics Explorer. - Metrics: Lists the metric names. You can optionally filter the result with a regular expression on the metric name.
- Series query: Lists the full time series (label sets) that match a series selector.
- Query result: Evaluates a raw PromQL expression, the same as the free-text path used for PPL.
To create a PromQL query variable, follow these steps:
- At the top of the dashboard, select Add variable, and set Type to Query.
- In the Query options section, select Open variable editor.
- Set the query language to PromQL.
- Select the dataset name and choose a dataset backed by a Prometheus data connection.
- In Query type, select a query type (for example, Label values) and complete its fields. For Label values, select the label and, optionally, a metric and one or more label matchers.
- Select Preview to load the options, then select Apply to save the query and close the editor.
- Configure refresh behavior, and then select Add variable.
The following image shows a PromQL query variable configured with the Label values query type.
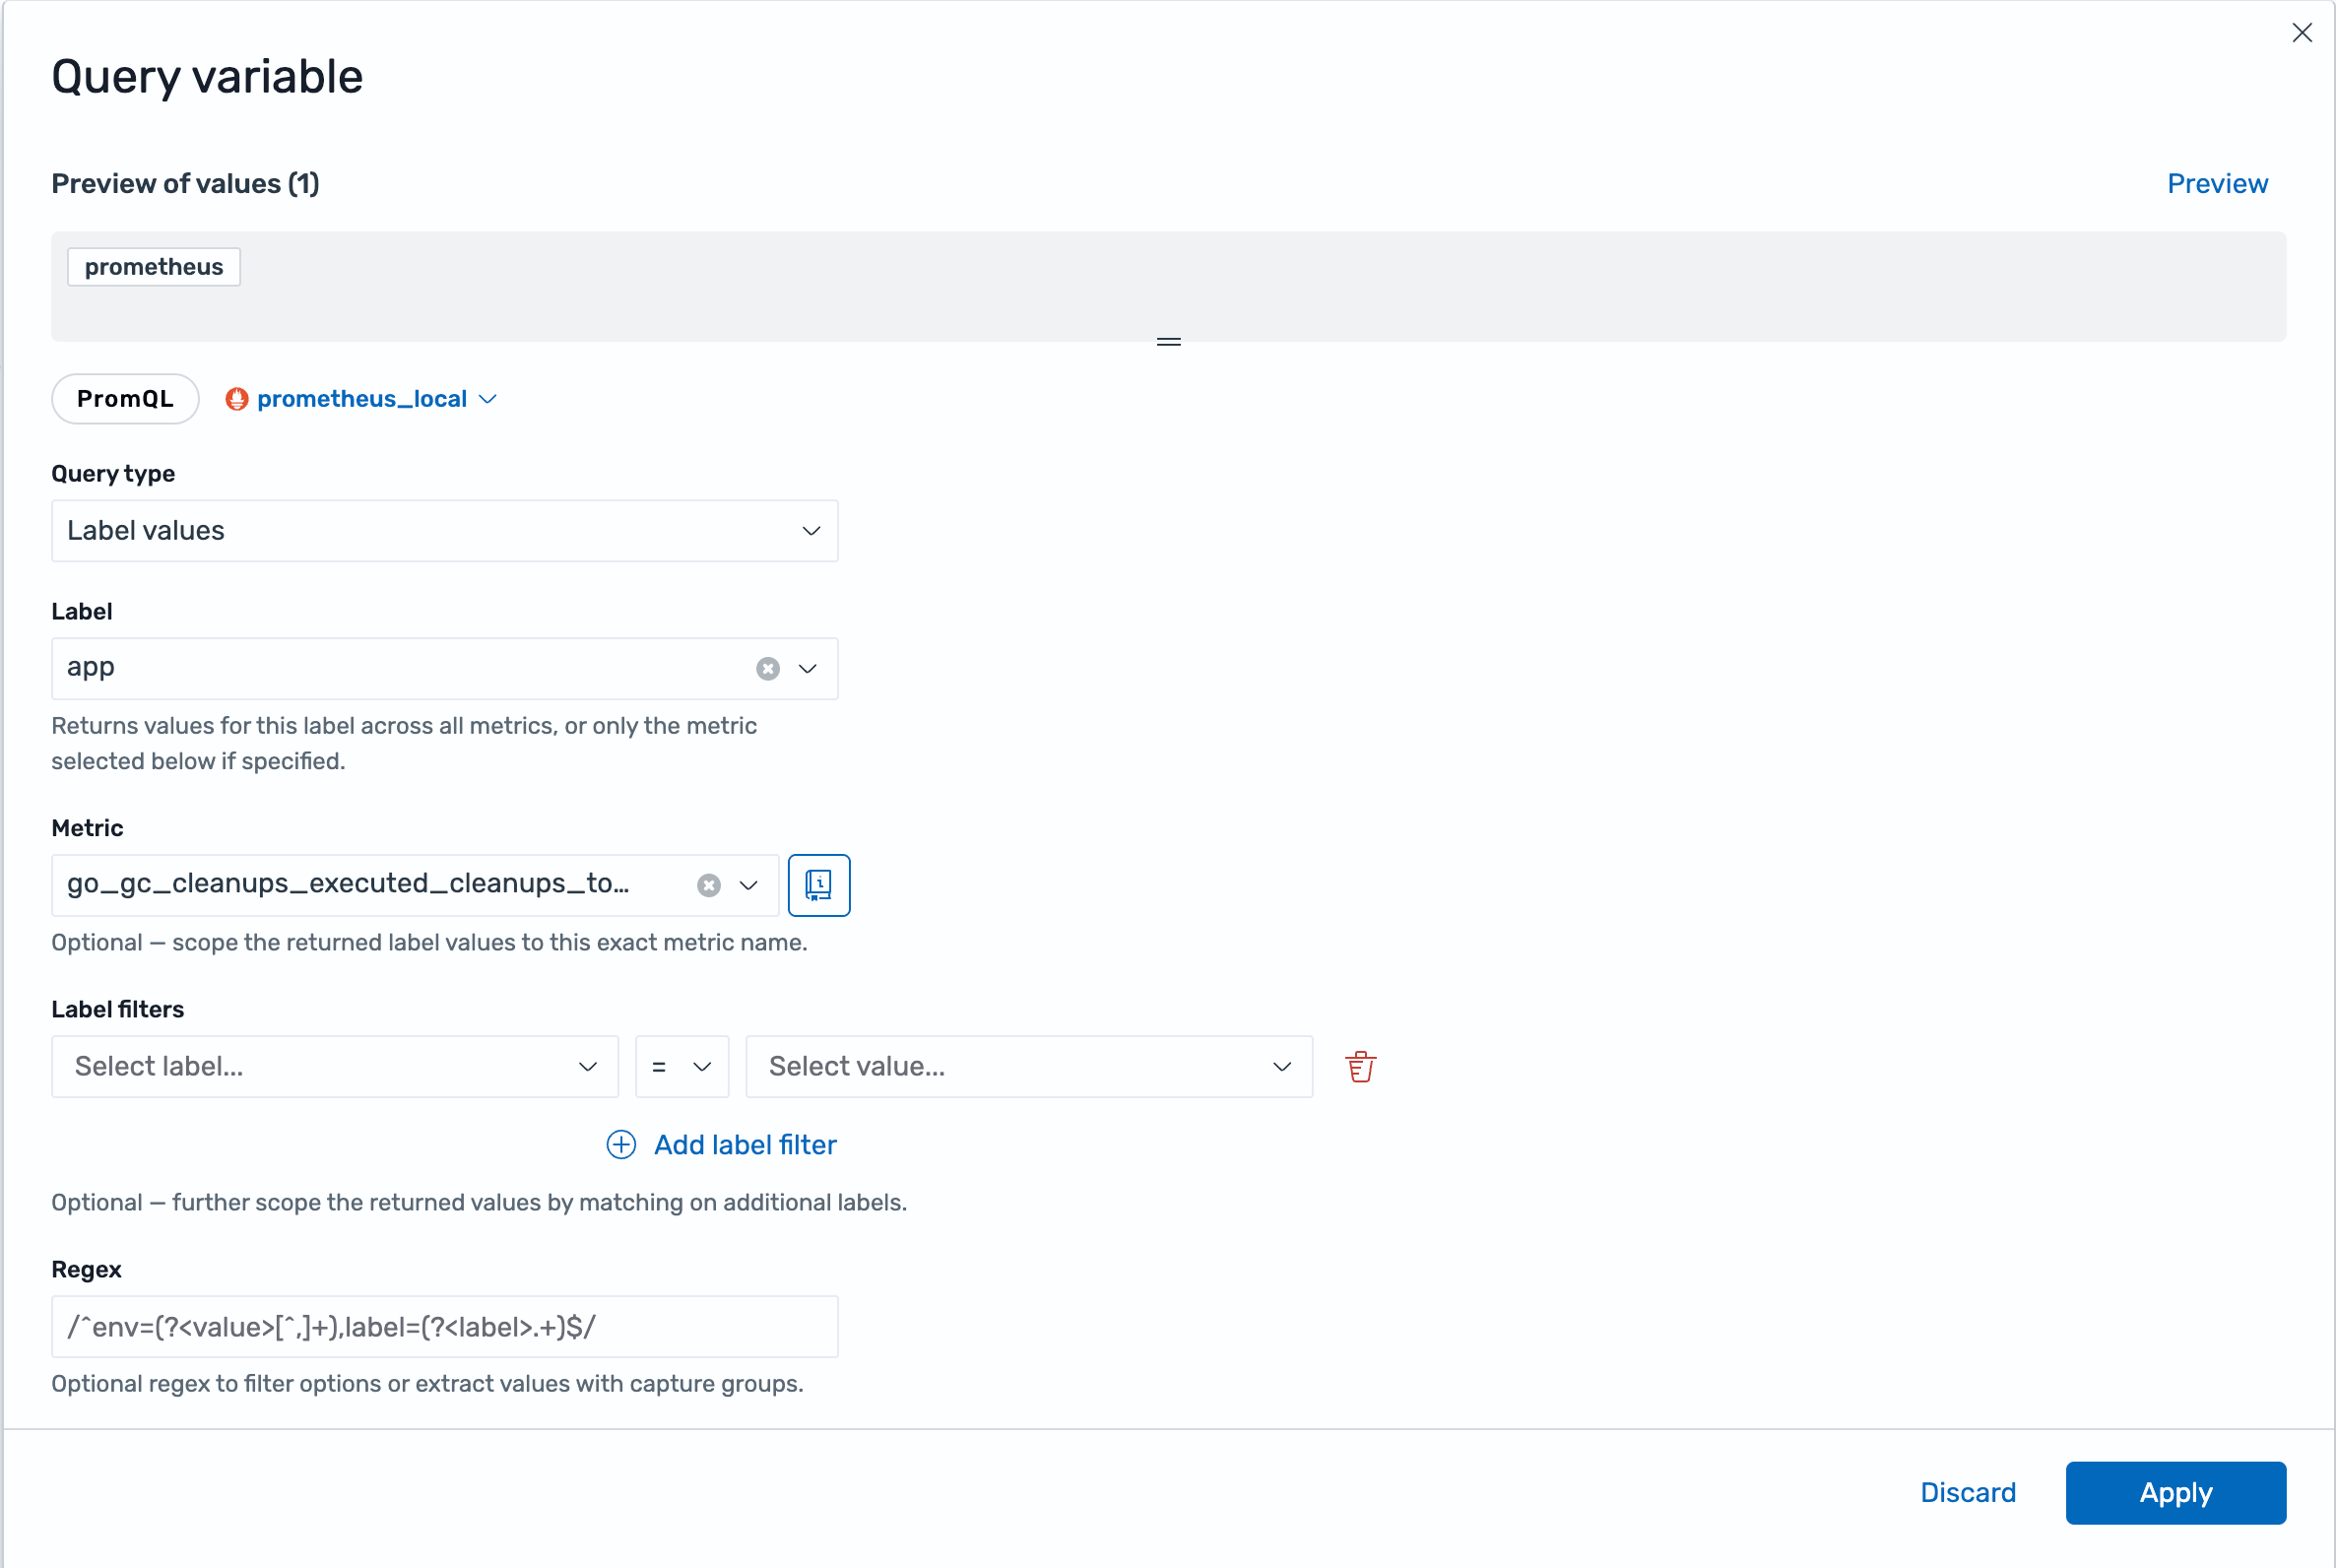
A PromQL query variable requires a dataset backed by a Prometheus data connection in your Observability workspace.
Filtering and extracting options with a regular expression
The Regex field in a query variable supports two behaviors. You can enter the expression as a bare pattern (for example, ^win) or in /pattern/flags form (for example, /^win/i).
The following examples use a query variable created from the sample web logs machine.os field:
source = opensearch_dashboards_sample_data_logs | stats count() by `machine.os` | fields `machine.os`
Previewing this query returns the options ios, osx, win 7, win 8, and win xp. You can then apply a regular expression to those results:
- Filtering: When the regular expression has no
valueorlabelcapture group, OpenSearch Dashboards keeps only the options that match and leaves them unchanged. For example,^winkeeps onlywin 7,win 8, andwin xp. - Extracting: When the regular expression includes a named
(?<value>...)capture group, OpenSearch Dashboards replaces each option’s value with the captured text. An optional named(?<label>...)group sets the display label. Options that resolve to the same value are deduplicated automatically. For example,^(?<value>ios|osx|win)extracts the operating system family, sowin 7,win 8, andwin xpcollapse into a singlewinoption, leavingios,osx, andwin.
To set a separate display label, add a (?<label>...) group. For example, if a query returns compound values such as env=dev,label=Development, the pattern ^env=(?<value>[^,]+),label=(?<label>.+)$ stores dev as the value and shows Development in the dropdown.
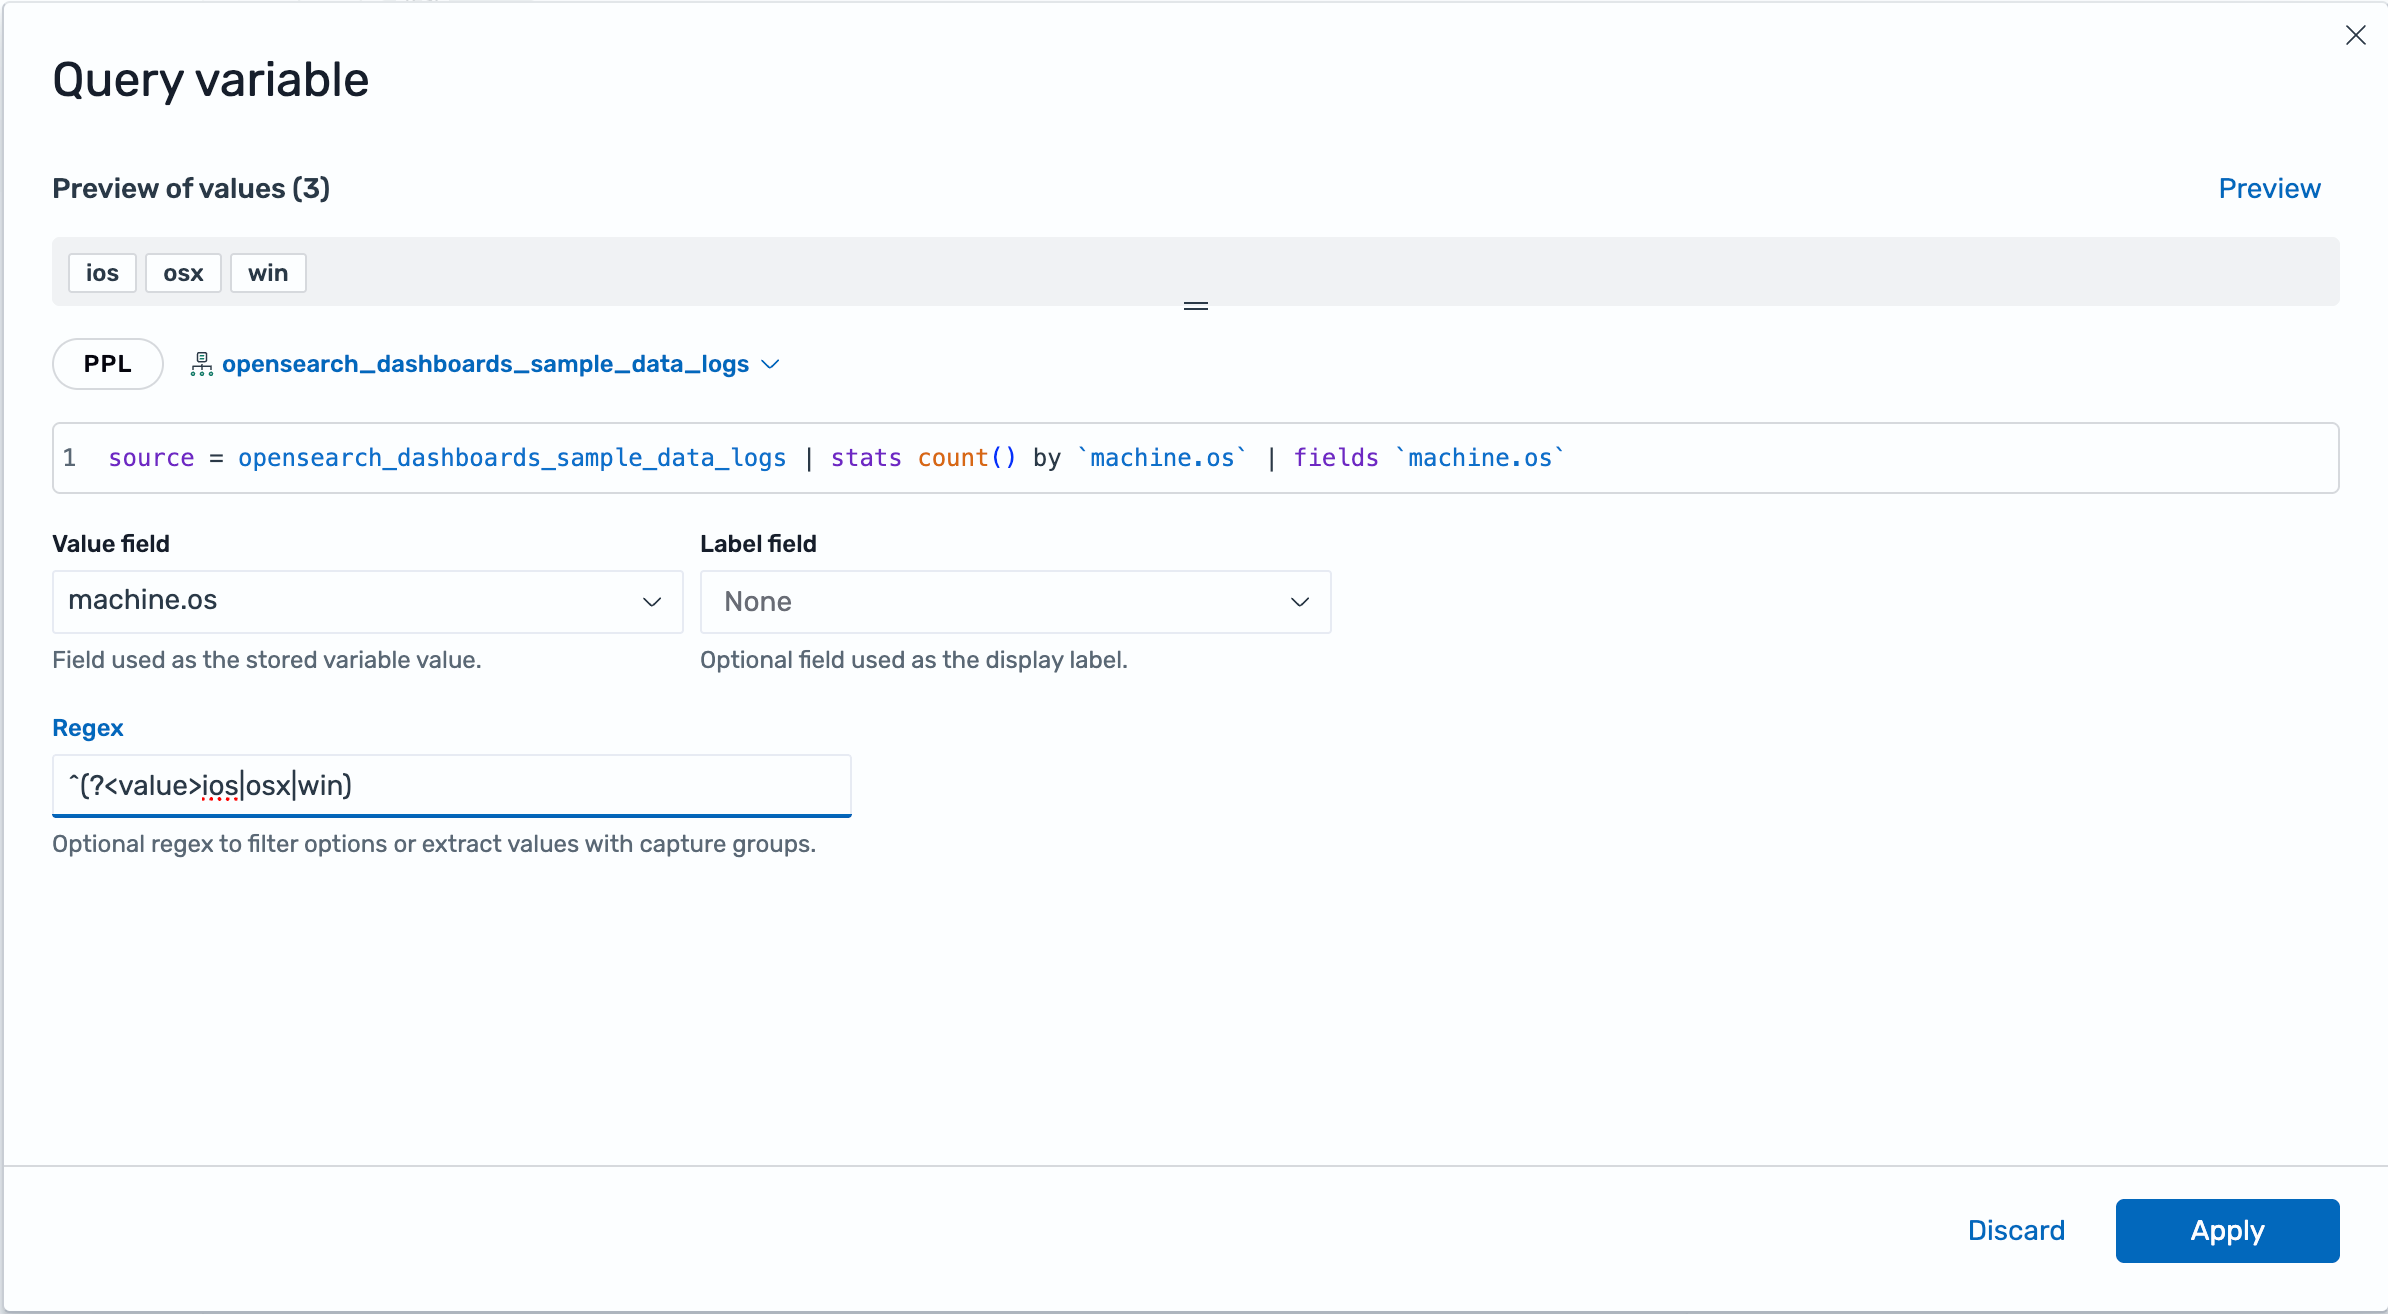
When you edit an existing variable, the query preview runs automatically so that you can see the extracted options right away.
Creating a custom variable
Use a custom variable when the list of available values is fixed and does not need to be fetched from a data source. For example, you can create an environment variable containing the dev, staging, and prod options.
To create a custom variable, follow these steps:
- In your Observability workspace, select Dashboards in the left navigation.
- Open an existing dashboard or select Create Dashboard to create a new dashboard. If you create a new dashboard, save it first by entering a title and selecting Save.
- If the dashboard is in view mode, turn on the Edit toggle.
- At the top of the dashboard, select Add variable.
- Configure the following general settings:
- Name: Enter
environment. This is the identifier used to reference the variable in queries, for example,$environmentor${environment}. - Label: Enter
Environment. - Description: Optionally, enter a description, such as
Filters visualizations by deployment environment. - Type: Select Custom.
- Name: Enter
- In Custom options, select Add option.
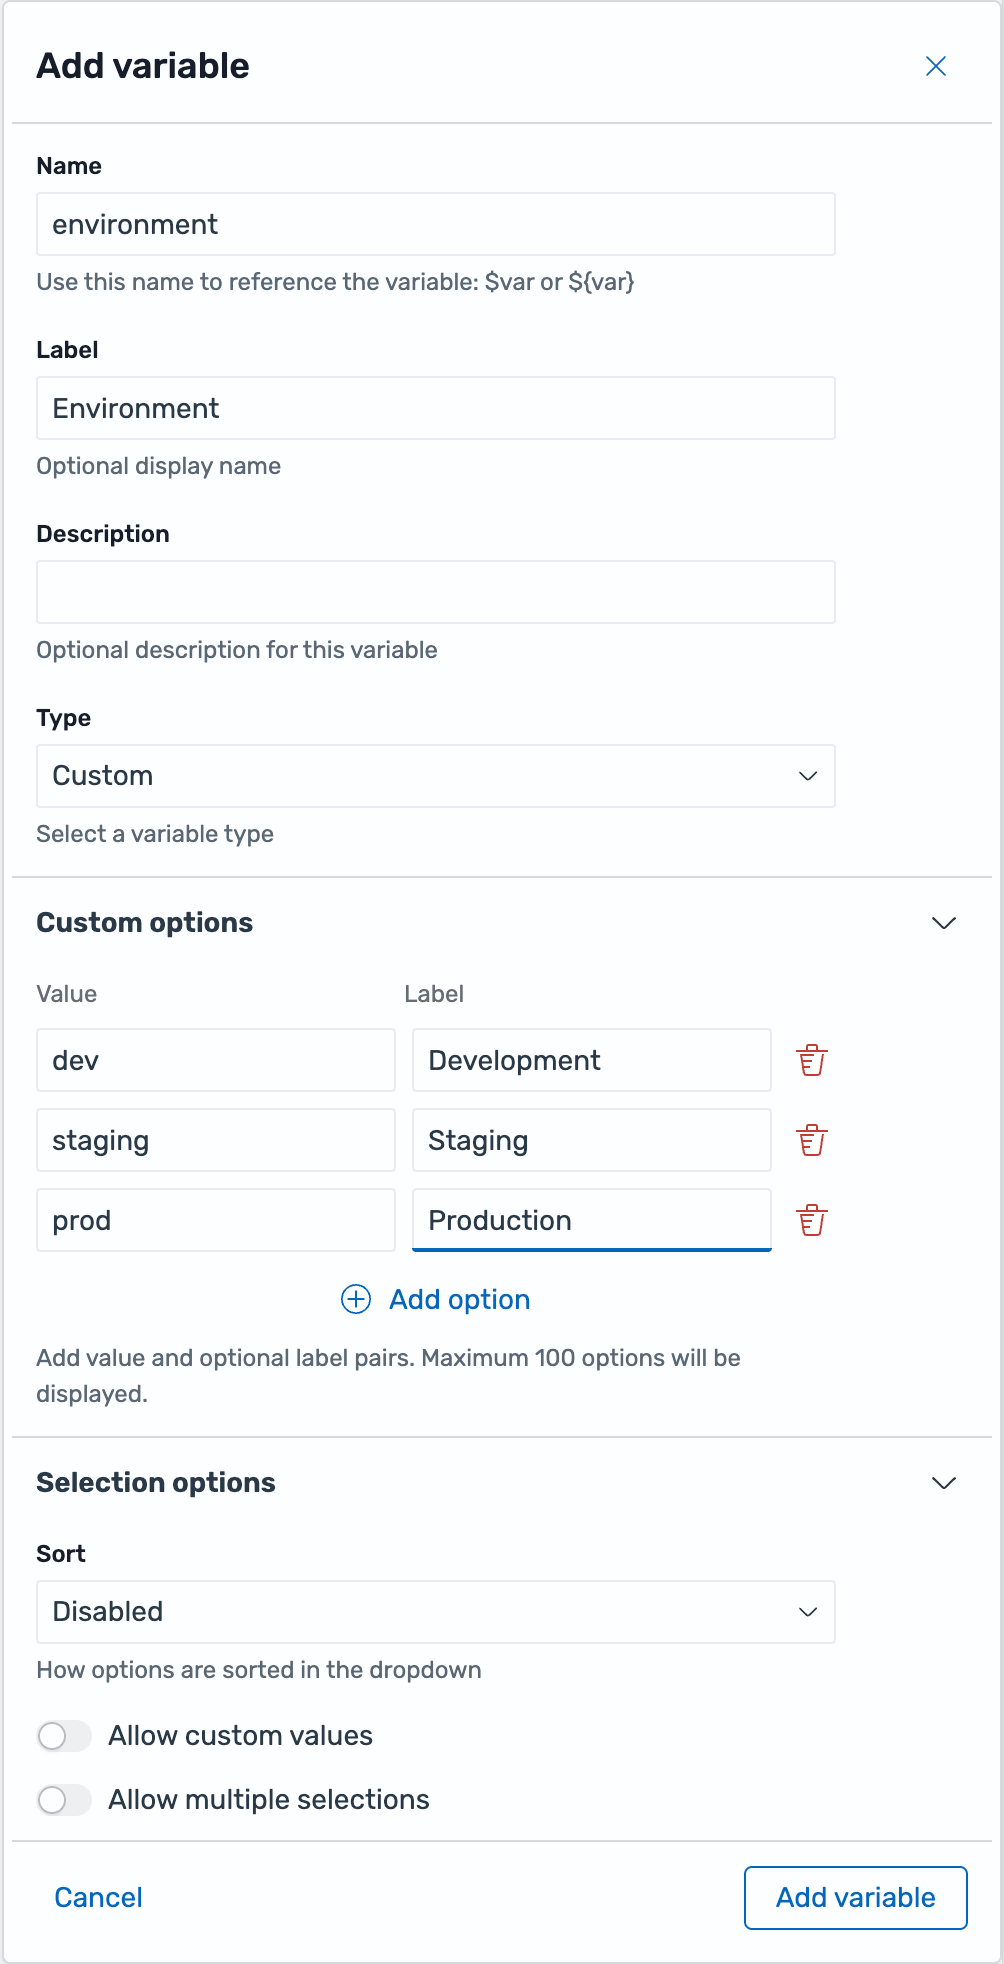
- In the first option row, enter
devin Value andDevelopmentin Label. OpenSearch Dashboards inserts the value into queries when you reference the variable and uses the optional label as the display text in the dropdown list. - Select Add option again and enter
stagingin Value andStagingin Label. - Select Add option again and enter
prodin Value andProductionin Label. - Configure the shared option settings. For more information, see Configuring variable option settings.
- Select Add variable.
Custom option values must be unique and cannot be empty. OpenSearch Dashboards displays a maximum of 100 options in the dropdown list.
The following image shows an environment custom variable configured with value and label pairs.
Creating a text variable
Use a text variable when you want to type a single free-form value directly, without an option list. For example, you can create a search_term variable and change its value from the variables bar without opening the editor.
To create a text variable, follow these steps:
- In your Observability workspace, select Dashboards in the left navigation.
- Open an existing dashboard or select Create Dashboard to create a new dashboard. If you create a new dashboard, save it first by entering a title and selecting Save.
- If the dashboard is in view mode, turn on the Edit toggle.
- At the top of the dashboard, select Add variable.
- Configure the following general settings:
- Name: Enter
search_term. This is the identifier used to reference the variable in queries, for example,$search_termor${search_term}. - Label: Enter
Search term. - Description: Optionally, enter a description.
- Type: Select Text.
- Name: Enter
- In Value, enter an initial value.
- Select Add variable.
The text variable appears at the top of the dashboard as an input box. Enter a value and press Enter, or select outside the box, to apply it. The value is applied when you finish editing, not on every keystroke, so visualizations that reference the variable do not re-run while you type.
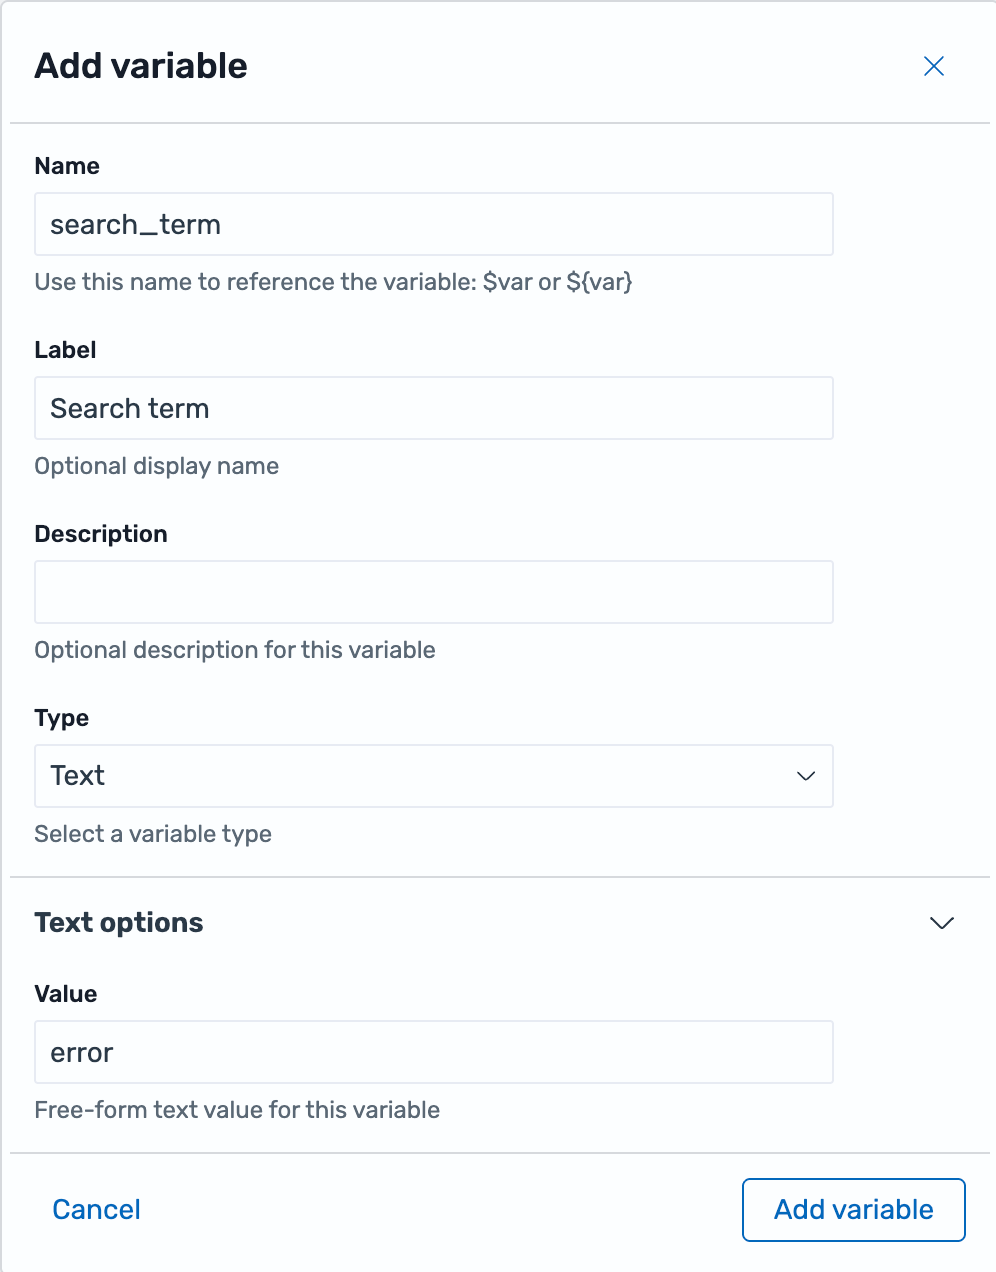
A text variable has no option list, so the Sort, Allow multiple selections, Include All option, and Allow custom values settings do not apply and are hidden for this type.
Configuring variable option settings
Query variables and custom variables share the following option settings:
- Sort: Controls how options are sorted in the dropdown list. Select Disabled, Alphabetical ascending or descending, or Numerical ascending or descending.
- Allow multiple selections: Allows you to select more than one value from the variable dropdown list.
- Include All option: Adds an All option to the dropdown list. This setting is available only when Allow multiple selections is turned on.
- Allow custom values: Lets you commit a value that is not in the generated or static option list. When this setting is turned on, typing in the variable dropdown’s search box offers the typed value as the first row, labeled Hit enter to add. Press Enter or select the row to add it. In a multiple-selection variable, the custom value is appended to the current selection; in a single-selection variable, it replaces the current value. A custom value is stored as the variable’s selected value only; it is not added to the variable definition.
Managing existing variables
The Manage variables panel lists all existing variables, including their type, name, and configuration options. To access this panel, follow these steps:
- Navigate to your workspace.
- From Dashboards, select the dashboard to update.
- On the top, toggle the Edit selector to enter edit mode.
- In the upper-left corner, select the Manage variables icon, as shown in the following image.
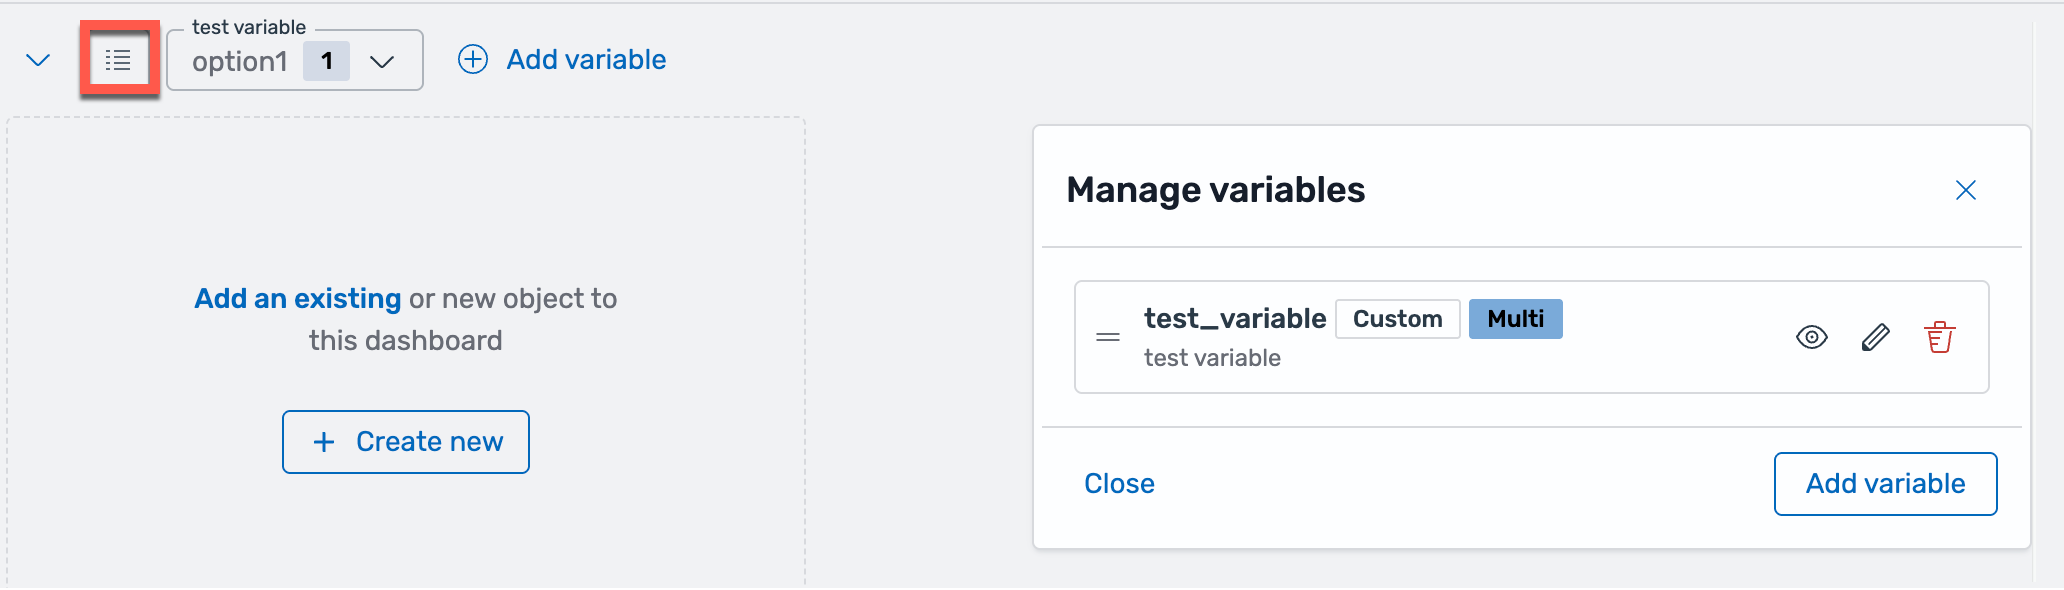
The Manage variables icon only appears when variables have been created in the dashboard. If no variables exist, create one first before accessing the management interface.
Editing a variable
To edit an existing variable, follow these steps:
- Open the Manage variables panel.
- Select the Edit icon for the variable you want to modify.
- Make your changes.
- Select Update variable to save.
Changing the variable name causes any queries that reference the old name to fail.
Deleting a variable
To delete a variable, follow these steps:
- Open the Manage variables panel.
- Select the Delete icon for the variable you want to remove.
- Confirm the deletion in the dialog.
Variables that are referenced by other variables or visualization editors display an indicator in the management panel. Deleting a referenced variable causes any queries that use it to fail.
Organizing variables
Variables are displayed at the top of the dashboard in the order they appear in the management panel.
To reorder variables, follow these steps:
- Open the Manage variables panel.
- Drag the reorder handle on the left side of a variable.
- Drop it in the desired position.
- Save the dashboard to apply the new order.
Hiding variables
You can hide variables from the top of the dashboard while keeping them available for use in queries.
To hide or show a variable, follow these steps:
- Open the Manage variables panel.
- Select the Hide/Show icon for the variable.
- Save the dashboard to apply the change.
Hidden variables are marked with a Hidden badge in the management panel and do not appear in the dashboard.
Variable status indicators
Each variable displays a status indicator at the top of the dashboard:
- Loading: A spinner appears while the system fetches options.
- Error: An error icon appears with a tooltip showing the error message. The dropdown is disabled.
- No options: If a variable query returns no results, “No options” is displayed in the dropdown.
URL synchronization
Variable values are automatically synchronized to the dashboard URL using the variableValues query parameter:
?variableValues=(service:(api),region:(us-east,us-west))
URL synchronization enables the following functionality:
- Send a link to a dashboard with specific variable values preselected.
- Save a dashboard view with your preferred variable settings.
- Preserve variable selections across page refreshes.
Variable dependencies
Query type variables can reference other variables in their queries. The following example shows a query variable that references another variable:
source=logs | where region=$region | dedup service | fields service
In this example, the service variable depends on the region variable. When the region variable changes, the service variable automatically refreshes its options.
Keep the following considerations in mind:
- Avoid circular dependencies where Variable A references Variable B, and Variable B references Variable A.
- Variables are evaluated in the order they appear in the management panel. Place dependent variables after the variables they reference.