You're viewing version 3.8 of the OpenSearch documentation. This version is no longer maintained. For the latest version, see the current documentation. For information about OpenSearch version maintenance, see Release Schedule and Maintenance Policy.
ISM policies
Policies are entities (stored as JSON documents) that define the following:
- The states that an index can be in, including the default state for new indexes. For example, you might name your states “hot,” “warm,” “delete,” and so on. For more information, see States.
- Any actions that you want the plugin to take when an index enters a state, such as performing a rollover. For more information, see Actions.
- The conditions that must be met for an index to move into a new state, known as transitions. For example, if an index is more than eight weeks old, you might want to move it to the “delete” state. For more information, see Transitions.
Actions and transitions are associated with states. A condition (such as index size or age) triggers a transition to a new state, and entering a state triggers its actions.
You have complete flexibility in the way you can design your policies. You can create any state, transition to any other state, and specify any number of actions in each state.
The following table lists the fields of a policy.
| Field | Description | Type | Required | Read Only |
|---|---|---|---|---|
policy_id | The name of the policy. | String | Yes | Yes |
description | A human-readable description of the policy. | String | Yes | No |
ism_template | An ISM template to automatically apply the policy to the newly created index. | Nested list of objects | No | No |
ism_template.index_patterns | A pattern that matches the newly created index name. | List of strings | No | No |
ism_template.priority | A priority used to choose which policy to apply when multiple policies match a newly created index name. | Integer | No | No |
last_updated_time | The time the policy was last updated. | Timestamp | Yes | Yes |
error_notification | The destination and message template for error notifications. The destination could be Amazon Chime, Slack, or a webhook URL. | Object | No | No |
default_state | The default starting state for each index that uses this policy. | String | Yes | No |
states | The states that you define in the policy. | Nested list of objects | Yes | No |
States
A state defines the status of a managed index. A managed index can be in only one state at a time. A state’s actions are executed sequentially on entering a state. A state’s transitions are checked periodically after all the actions have been completed.
The following table lists the parameters that you can define for a state.
| Field | Description | Type | Required |
|---|---|---|---|
name | The name of the state. | String | Yes |
actions | The actions to execute after entering a state. If you omit this field, the state performs no actions. For more information, see Actions. | Nested list of objects | No |
transitions | The next states and the conditions required to transition to those states. If no transitions exist, the policy assumes that it’s complete and can now stop managing the index. For more information, see Transitions. | Nested list of objects | No |
Actions
Actions are operations that a policy can execute upon entering a specific state.
ISM executes actions in the order in which they are defined. If an action fails, the state actions are abandoned, and remaining actions are not executed.
For example, if you define actions [A,B,C,D], ISM does the following:
- Executes action
A. - Sleeps for a period based on the cluster setting
plugins.index_state_management.job_interval. - Executes action
B.
And so on.
If ISM cannot successfully execute action A, actions B, C, and D do not get executed.
Optionally, you can define an action’s timeout period. When the timeout expires, ISM fails the action. The timeout covers the whole action, not a single attempt: the clock starts when ISM begins the action and keeps running through every step, retry, and retry delay, including the time between job runs while the action waits for its conditions to be met.
ISM checks the clock only when the managed index job runs, which is every 5 minutes by default. For example, a rollover operation with min_index_age set to 1d evaluates min_index_age on each job run until the index is 1 day old. A timeout of 1h therefore causes the action to fail before the index can meet the condition.
When the timeout expires, ISM marks the action as failed and stops managing the index until you call the Retry failed index API, which restarts the action and its clock. A timeout does not stop work that ISM already started or undo changes that the action already made.
Because ISM runs one step per job run, make the timeout longer than the total time that the action needs, plus one job interval for each of its steps. If you omit timeout, the action never times out and continues to retry according to its retry configuration.
The following table lists the parameters that you can define for an action.
| Parameter | Description | Type | Required | Default |
|---|---|---|---|---|
timeout | The timeout period for the action. Accepts time units for minutes, hours, and days. | Time unit | No | - |
retry | The retry configuration for the action. | Object | No | Specific to action |
The retry operation has the following parameters.
| Parameter | Description | Type | Required | Default |
|---|---|---|---|---|
count | The number of retry counts. | Integer | Yes | - |
backoff | The backoff policy type to use when retrying. Valid values are Exponential, Constant, and Linear. | String | No | Exponential |
delay | The time to wait between retries. Accepts time units for minutes, hours, and days. | Time unit | No | 1 minute |
Example action
The following example read_only action has a timeout period of one hour. The policy retries this action three times with an exponential backoff policy, with a delay of 10 minutes between each retry:
"actions": [
  {
    "timeout": "1h",
    "retry": {
      "count": 3,
      "backoff": "exponential",
      "delay": "10m"
    },
    "read_only": {}
  }
]
For a list of available unit types, see Supported units.
Transitions
Transitions define the conditions that trigger a state to change. After all actions in the current state are completed, the policy starts checking the conditions for transitions.
ISM evaluates transitions in the order in which they are defined. It uses the first transition that evaluates to true.
If you don’t specify any conditions in a transition, then it always evaluates to true. If the policy checks such a transition, it immediately transitions the index to the state defined in the transition.
For example, assume you’ve defined the transitions: [A,B,C,D], and that transitions A, B, and C currently evaluate to false and that D has no conditions. ISM iterates through the list in order and sets the next state to the one defined in transition D. On its next execution, ISM starts in the state defined by D.
This table lists the parameters you can define for transitions.
| Parameter | Description | Type | Required |
|---|---|---|---|
state_name | The name of the state to transition to if the conditions are met. | String | Yes |
conditions | List the conditions for the transition. | List | Yes |
The conditions object has the following parameters.
| Parameter | Description | Type | Required |
|---|---|---|---|
min_index_age | The minimum age of the index required to transition. | String | No |
min_rollover_age | The minimum age required after a rollover has occurred to transition to the next state. | String | No |
min_state_age | The minimum amount of time the index must spend in the current state before transitioning. | String | No |
min_doc_count | The minimum document count of the index required to transition. | Integer | No |
min_size | The minimum size of the total primary shard storage (not counting replicas) required to transition. For example, if you set min_size to 100 GiB and your index has 5 primary shards and 5 replica shards of 20 GiB each, the total size of all primary shards is 100 GiB, so your index is transitioned to the next state. | String | No |
no_alias | Controls transition based on alias presence. If true, transition occurs only when the index has no aliases. If false, transition occurs only when at least one alias exists. | Boolean | No |
cron | The cron job that triggers the transition if no other transition happens first. | Object | No |
cron.cron.expression | The cron expression that triggers the transition. For the syntax, see Cron expressions. | String | Yes |
cron.cron.timezone | The time zone for the triggering cron expression triggers the transition. | String | Yes |
All time-based values (min_index_age, min_rollover_age, min_state_age) use standard OpenSearch time units.
The following example transitions the index to a cold state after a period of 30 days:
"transitions": [
  {
    "state_name": "cold",
    "conditions": {
      "min_index_age": "30d"
    }
  }
]
ISM checks the conditions on every execution of the policy based on the job_interval setting.
This example uses the cron condition to transition indexes every Saturday at 5:00 PT:
"transitions": [
  {
    "state_name": "cold",
    "conditions": {
      "cron": {
        "cron": {
          "expression": "* 17 * * SAT",
          "timezone": "America/Los_Angeles"
        }
      }
    }
  }
]
Note that this condition does not execute at exactly 5:00 PM; the job still executes as defined by the job_interval setting. Due to this variance in start time and the amount of time that it can take for actions to complete prior to checking transition conditions, we recommend against overly narrow cron expressions. For example, don’t use 15 17 * * SAT (5:15 PM on Saturday).
A window of an hour, which this example uses, is generally sufficient, but you might increase it to 2 or 3 hours to avoid missing the window and having to wait a week for the transition to occur. Alternately, you could use a broader expression such as * * * * SAT,SUN to have the transition occur at any time during the weekend.
For information about writing cron expressions, see Cron expressions.
Error notifications
An error_notification sends a notification if your managed index fails. Set it at the policy level, alongside default_state and states:
PUT _plugins/_ism/policies/hot_delete_workflow
{
  "policy": {
    "description": "hot delete workflow",
    "default_state": "hot",
    "error_notification": {
      "channel": {
        "id": "<channel_id>"
      },
      "message_template": {
        "source": "The index {{ctx.index}} failed during policy execution."
      }
    },
    "states": [
      {
        "name": "hot",
        "actions": [],
        "transitions": []
      }
    ]
  }
}
An error_notification requires a message_template, and it must name either a destination or a channel, so an empty object is rejected with 400.
An error notification sends to a single destination or notification channel with a custom message.
| Parameter | Description | Type | Required |
|---|---|---|---|
destination | The destination URL. | Slack, Amazon Chime, or webhook URL | Yes if channel isn’t specified |
channel | A notification channel’s ID | String | Yes if destination isn’t specified |
message_template | The text of the message. You can add variables to your messages using Mustache templates. | Object | Yes |
The destination system must return a response otherwise the error_notification operation throws an error.
Example 1: Chime notification
{
  "error_notification": {
    "destination": {
      "chime": {
        "url": "<url>"
      }
    },
    "message_template": {
      "source": "The index {{ctx.index}} failed during policy execution."
    }
  }
}
Example 2: Custom webhook notification
{
  "error_notification": {
    "destination": {
      "custom_webhook": {
        "url": "https://<your_webhook>"
      }
    },
    "message_template": {
      "source": "The index {{ctx.index}} failed during policy execution."
    }
  }
}
Example 3: Slack notification
{
  "error_notification": {
    "destination": {
      "slack": {
        "url": "https://hooks.slack.com/services/xxx/xxxxxx"
      }
    },
    "message_template": {
      "source": "The index {{ctx.index}} failed during policy execution."
    }
  }
}
Example 4: Using a notification channel
{
  "error_notification": {
    "channel": {
      "id": "some-channel-config-id"
    },
    "message_template": {
      "source": "The index {{ctx.index}} failed during policy execution."
    }
  }
}
You can use the same options for ctx variables as the Notification operation.
Policies in OpenSearch Dashboards
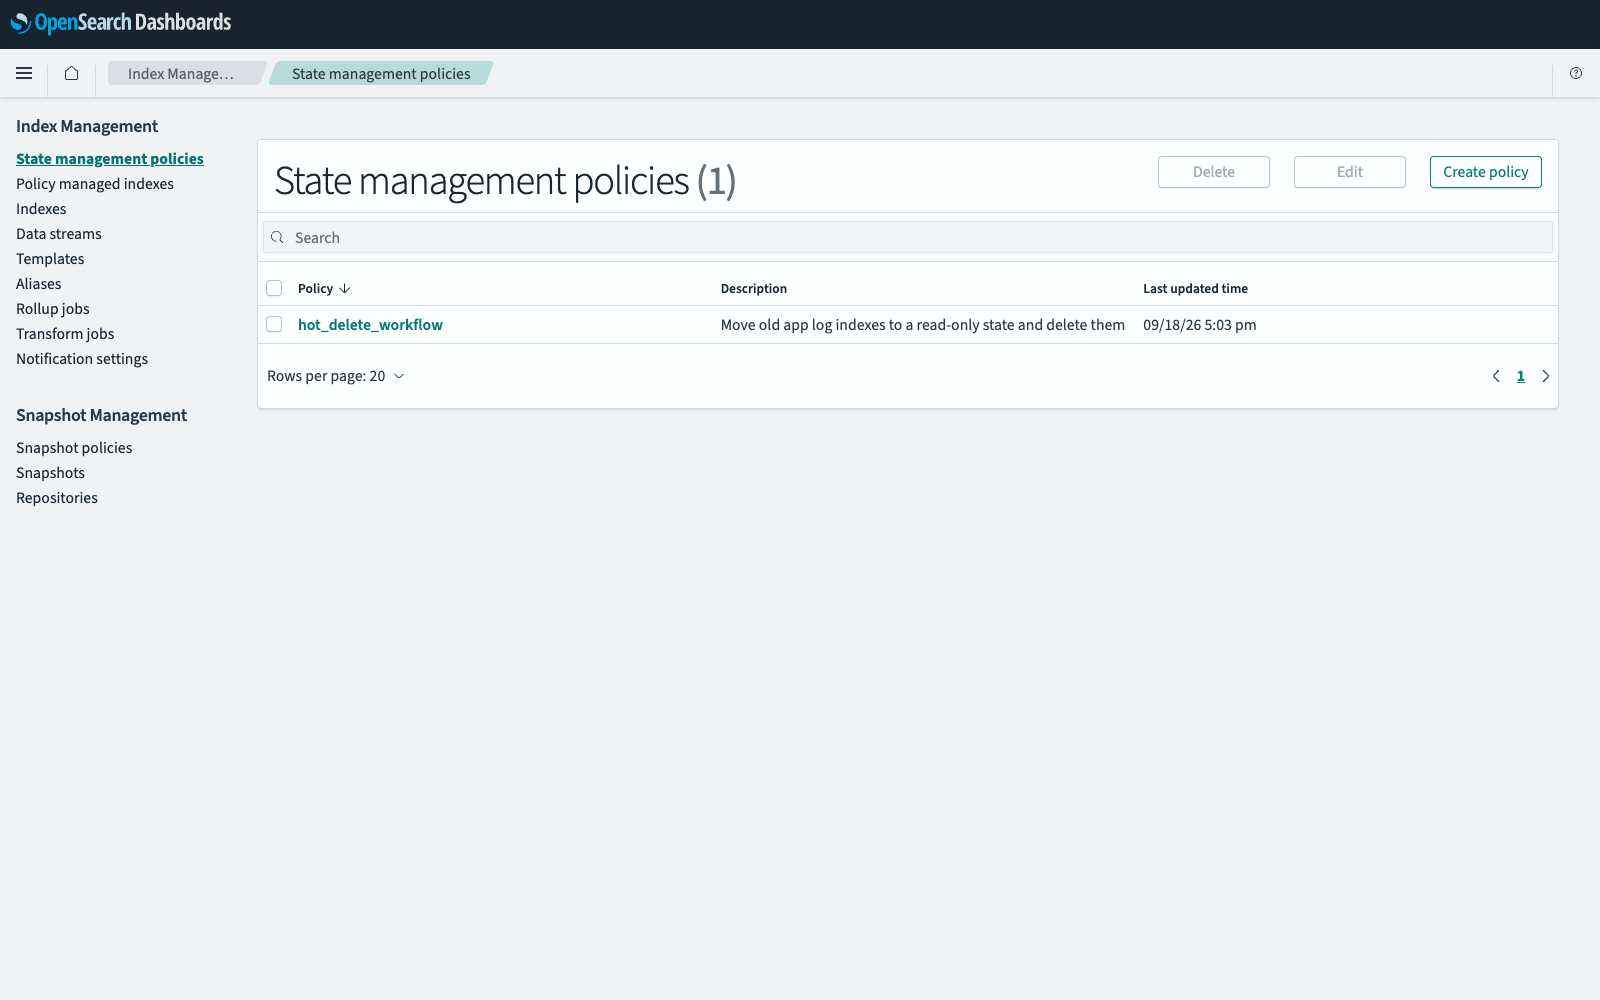
To navigate to the Index Management page, go to Management > Index Management on the top menu. Select State management policies to list the policies in your cluster.
Policies are created in either a visual editor or a JSON editor. The visual editor presents the parts of a policy as separate panels—error notification, ISM templates, and states—with the available actions and transition conditions in lists, so use it to compose a new policy. Use the JSON editor to paste a policy that you already have.
The following image shows the State management policies page.
Viewing a policy
- In Index Management, select State management policies.
- Select the policy in the Policy column.
The page shows the Policy settings, ISM templates, and States panels. To view the actions and transitions of a state, select the  (expand) icon next to the state name.
Creating a policy
- In Index Management, select State management policies, and then select Create policy.
- Select Visual editor or JSON editor, and then select Continue.
- In Policy info, enter a unique Policy ID that describes what the policy does, such as
hot_cold_workflow, and, optionally, a description. - Optionally, in Error notification, select a Channel ID to be notified when a policy run fails. For more information, see Error notifications. If the policy rolls over indexes automatically, configure this notification: it tells you about unexpectedly large indexes when a rollover fails.
- Optionally, in ISM templates, add the index patterns that attach this policy to new indexes. See Adding an ISM template.
- In States, select Add state to add each state of the policy. See Adding a state. A policy must contain at least one state.
- In Initial state, select the state that a newly managed index starts in.
- Select Create.
In the JSON editor, enter the policy ID in Name policy, enter the policy in Define policy, and then select Create.
Adding a state
In States on the Create policy page, select Add state, and then do the following:
- Enter a State name that describes the stage of the index lifecycle, such as
hot,warm, ordelete. - To place the state relative to the states that you have already defined, select Add before or Add after in Order, and then select the state to position it against. Skip this step for the first state.
-
For each operation that the state performs, do the following:
- Select Add action.
- Select an Action type. For the available types and their parameters, see ISM supported operations.
- Enter the parameters of the action. For example, the snapshot action requires a repository and a snapshot name.
- Optionally, enter a Timeout period after which the action fails, such as
5h, and a Retry count, Retry backoff policy, and Retry delay, such as1d. - Select Add action.
-
For each transition out of the state, do the following:
- Select Add transition.
- In Destination state, select the state to transition to. To transition a state to itself, enter its name, because it is not in the list.
- Select a Condition and enter its parameters. For example, the minimum document count condition requires the number of documents that triggers the transition. A transition without a condition always evaluates to
true. - Select Add transition.
- Select Save state.
Adding an ISM template
An ISM template attaches the policy to each new index whose name matches one of its index patterns:
- In ISM templates on the Create policy page, select Add template.
- In Index patterns, enter an index pattern. For example, the pattern
sample-index-*attaches the policy to every new index whose name begins withsample-index-. An index pattern cannot contain any of the following characters::,",+,/,\,|,?,#,>, or<. - In Priority, enter a priority for the pattern. When more than one template matches the name of a new index, ISM applies the template with the highest priority.
- Optionally, repeat the preceding steps to add more templates.
An ISM template applies only to indexes created after it. For more information, see Attaching a policy to new indexes.
Editing a policy
- In Index Management, select State management policies.
- Select the policy in the Policy column, and then select Edit.
- Select Visual editor or JSON editor.
- Change any part of the policy except the policy ID, and then select Update.
The changes take effect the next time the policy runs. Indexes that the policy already manages continue with the cached version of the policy until then. To move a managed index to a different policy, see Managed indexes.
Deleting a policy
- In Index Management, select State management policies.
- Select the checkbox next to each policy that you want to delete, and then select Delete.
- Select Delete in the confirmation dialog.
A deleted policy stops managing its indexes immediately and cannot be recovered.