Defining users and roles
You define users in OpenSearch to control who has access to OpenSearch data. You can use the internal user database to store users, or you can store them in an external authentication system, such as LDAP or Active Directory.
You define roles to determine the scope of a permission or action group. You can create roles with specific privileges, for example, roles that contain any combination of cluster-wide permissions, index-specific permissions, document- and field-level security, and tenants.
You can map users to roles during user creation or after users and roles have been defined. This mapping determines the permissions and access levels for each user based on the roles they are assigned.
Table of contents
Defining users
You can define users by using OpenSearch Dashboards, internal_users.yml, or the REST API. When creating users, you can map users to roles by using internal_users.yml or the REST API. If you are using OpenSearch Dashboards to define users, follow the steps in the Map users to roles tutorial.
Unless you are defining new reserved or hidden users, using OpenSearch Dashboards or the REST API to create new users, roles, and role mappings is recommended. The .yml files are for initial setup and are not for ongoing use.
OpenSearch Dashboards
- Choose Security, Internal Users, and Create internal user.
- Provide a username and password. The Security plugin automatically hashes the password and stores it in the
.opendistro_securityindex. -
If desired, specify user attributes.
Attributes are optional user properties that you can use for variable substitution in index permissions or document-level security.
- Choose Submit.
internal_users.yml
See YAML files.
REST API
See Create user.
Defining roles
Similarly to defining users, you can define roles using OpenSearch Dashboards, roles.yml, or the REST API. OpenSearch provides predefined roles and a special read-only role.
Unless you are defining new reserved or hidden users, using OpenSearch Dashboards or the REST API to create new users, roles, and role mappings is recommended. The .yml files are for initial setup and are not for ongoing use.
OpenSearch Dashboards
- Choose Security, Roles, and Create role.
- Provide a name for the role.
-
Add permissions as desired.
For example, you might give a role no cluster permissions,
readpermissions to two indexes,unlimitedpermissions to a third index, and read permissions to theanalyststenant. - Choose Submit.
roles.yml
See YAML files.
REST API
See Create role.
Editing roles
You can edit roles using one of the following methods.
OpenSearch Dashboards
- Choose Security > Roles. In the Create role section, select Explore existing roles.
- Select the role you want to edit.
- Choose edit role. Make any necessary updates to the role.
- To save your changes, select Update.
roles.yml
See YAML files.
REST API
See Patch role.
Mapping users to roles
If you didn’t specify roles when you created your user, you can map roles to it afterwards.
Just like users and roles, you create role mappings using OpenSearch Dashboards, roles_mapping.yml, or the REST API.
OpenSearch Dashboards
- Choose Security, Roles, and a role.
- Choose the Mapped users tab and Manage mapping.
- Specify users or external identities (also known as backend roles).
- Choose Map.
roles_mapping.yml
See YAML files.
REST API
See Create role mapping.
Defining read-only roles
A read-only role grants a user the ability to read data from the OpenSearch cluster but not to modify or delete any data. The read-only role is useful when you want to provide access to data for reporting, analysis, or visualization purposes without allowing modifications to the data or the cluster itself. This maintains data integrity and prevents accidental or unauthorized changes.
As with any role in OpenSearch, a read-only role can be configured using the following methods:
- Using OpenSearch Dashboards
- Modifying the
ymlconfiguration files - Using the Cluster Settings API
The simplest way to get familiar with roles and role mappings is to use OpenSearch Dashboards. The interface simplifies creating roles and assigning those roles to users, with an easy-to-navigate workflow.
Defining a basic read-only role
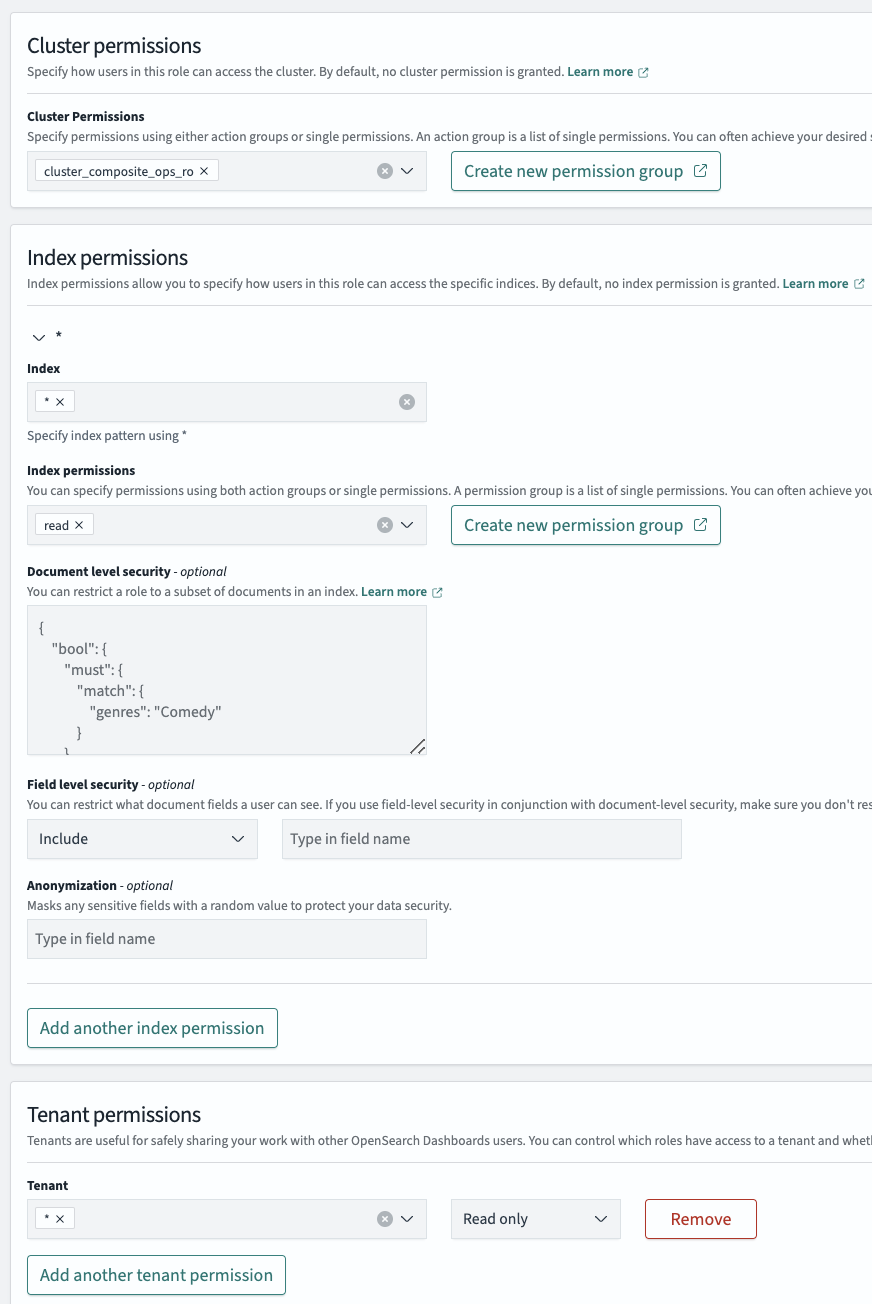
To create a basic read-only role that allows a user to access OpenSearch Dashboards, view existing dashboards and visualizations, and query different indexes, use the following permissions. These permissions give the user access to all tenants and indexes on the cluster.
Cluster permissions
For a user requiring read-only access to cluster-wide resources, such as visualizations or dashboards, add the cluster_composite_ops_ro permission to that user’s role.
Index permissions
A user requiring access to view visualizations will also require access to the index used to create the visualization. To give a user read-only access to all indexes, specify all (*) under the Index dropdown and Read in Index Permissions.
Tenant permissions
If you use tenants to split work between teams or projects, use the all (*) option followed by the Read only option, as shown in the following image.
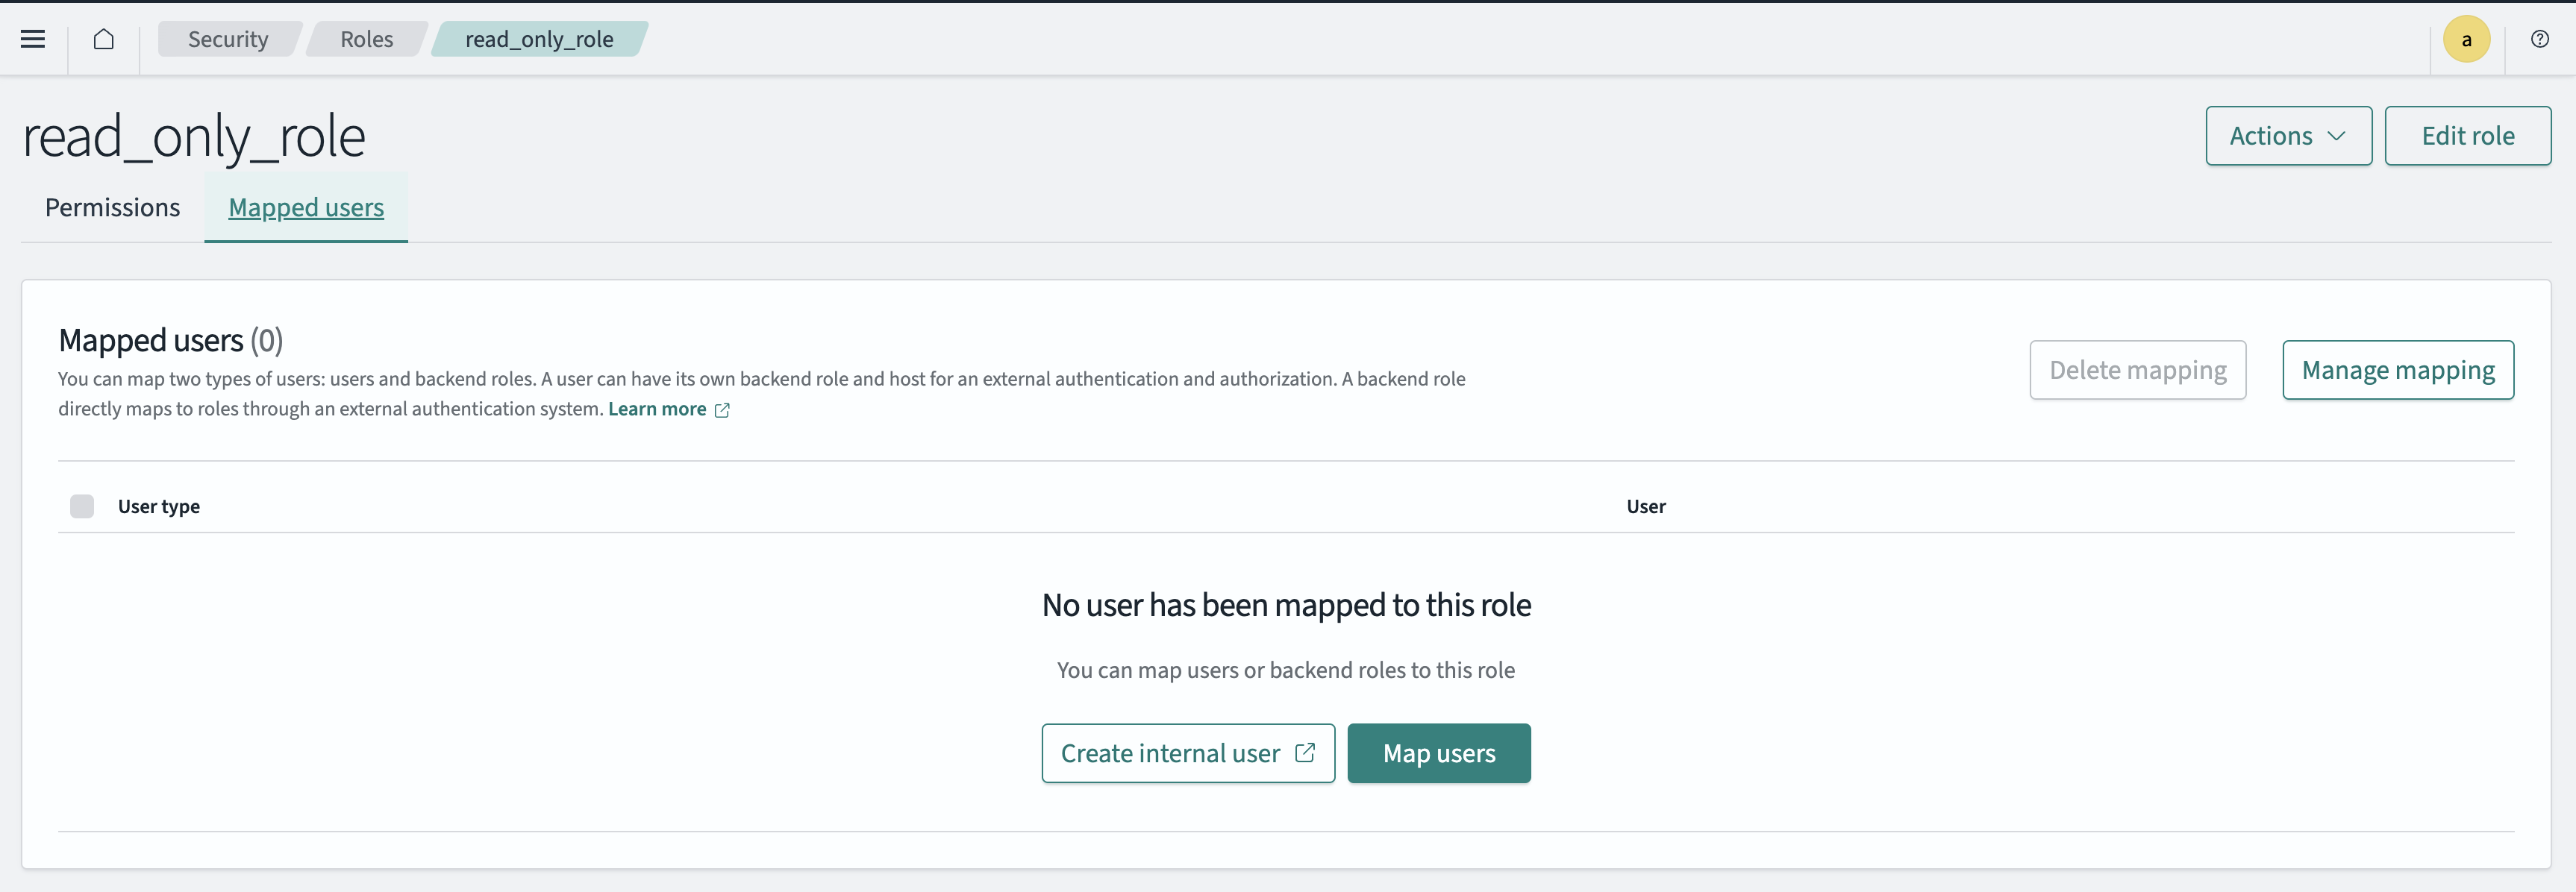
After setting all permission types and defining the role, you can map the role directly to a user on the role’s Mapped users tab. Select Map users and then choose a user to map to the role, as shown in the following image.
OpenSearch Dashboards readonly_mode
The OpenSearch Dashboards readonly_mode functionality is used to give a user access to the Dashboards interface only, removing all other UI elements from view.
To configure this role, add the following line to your opensearch_dashboards.yml file:
opensearch_security.readonly_mode.roles: [new_role]
Even if the assigned role grants additional privileges or a user is mapped to other roles with write access to indexes, OpenSearch Dashboards restricts this access. Direct access to OpenSearch data using CURL or API is still allowed. OpenSearch Dashboards is not involved in this communication.
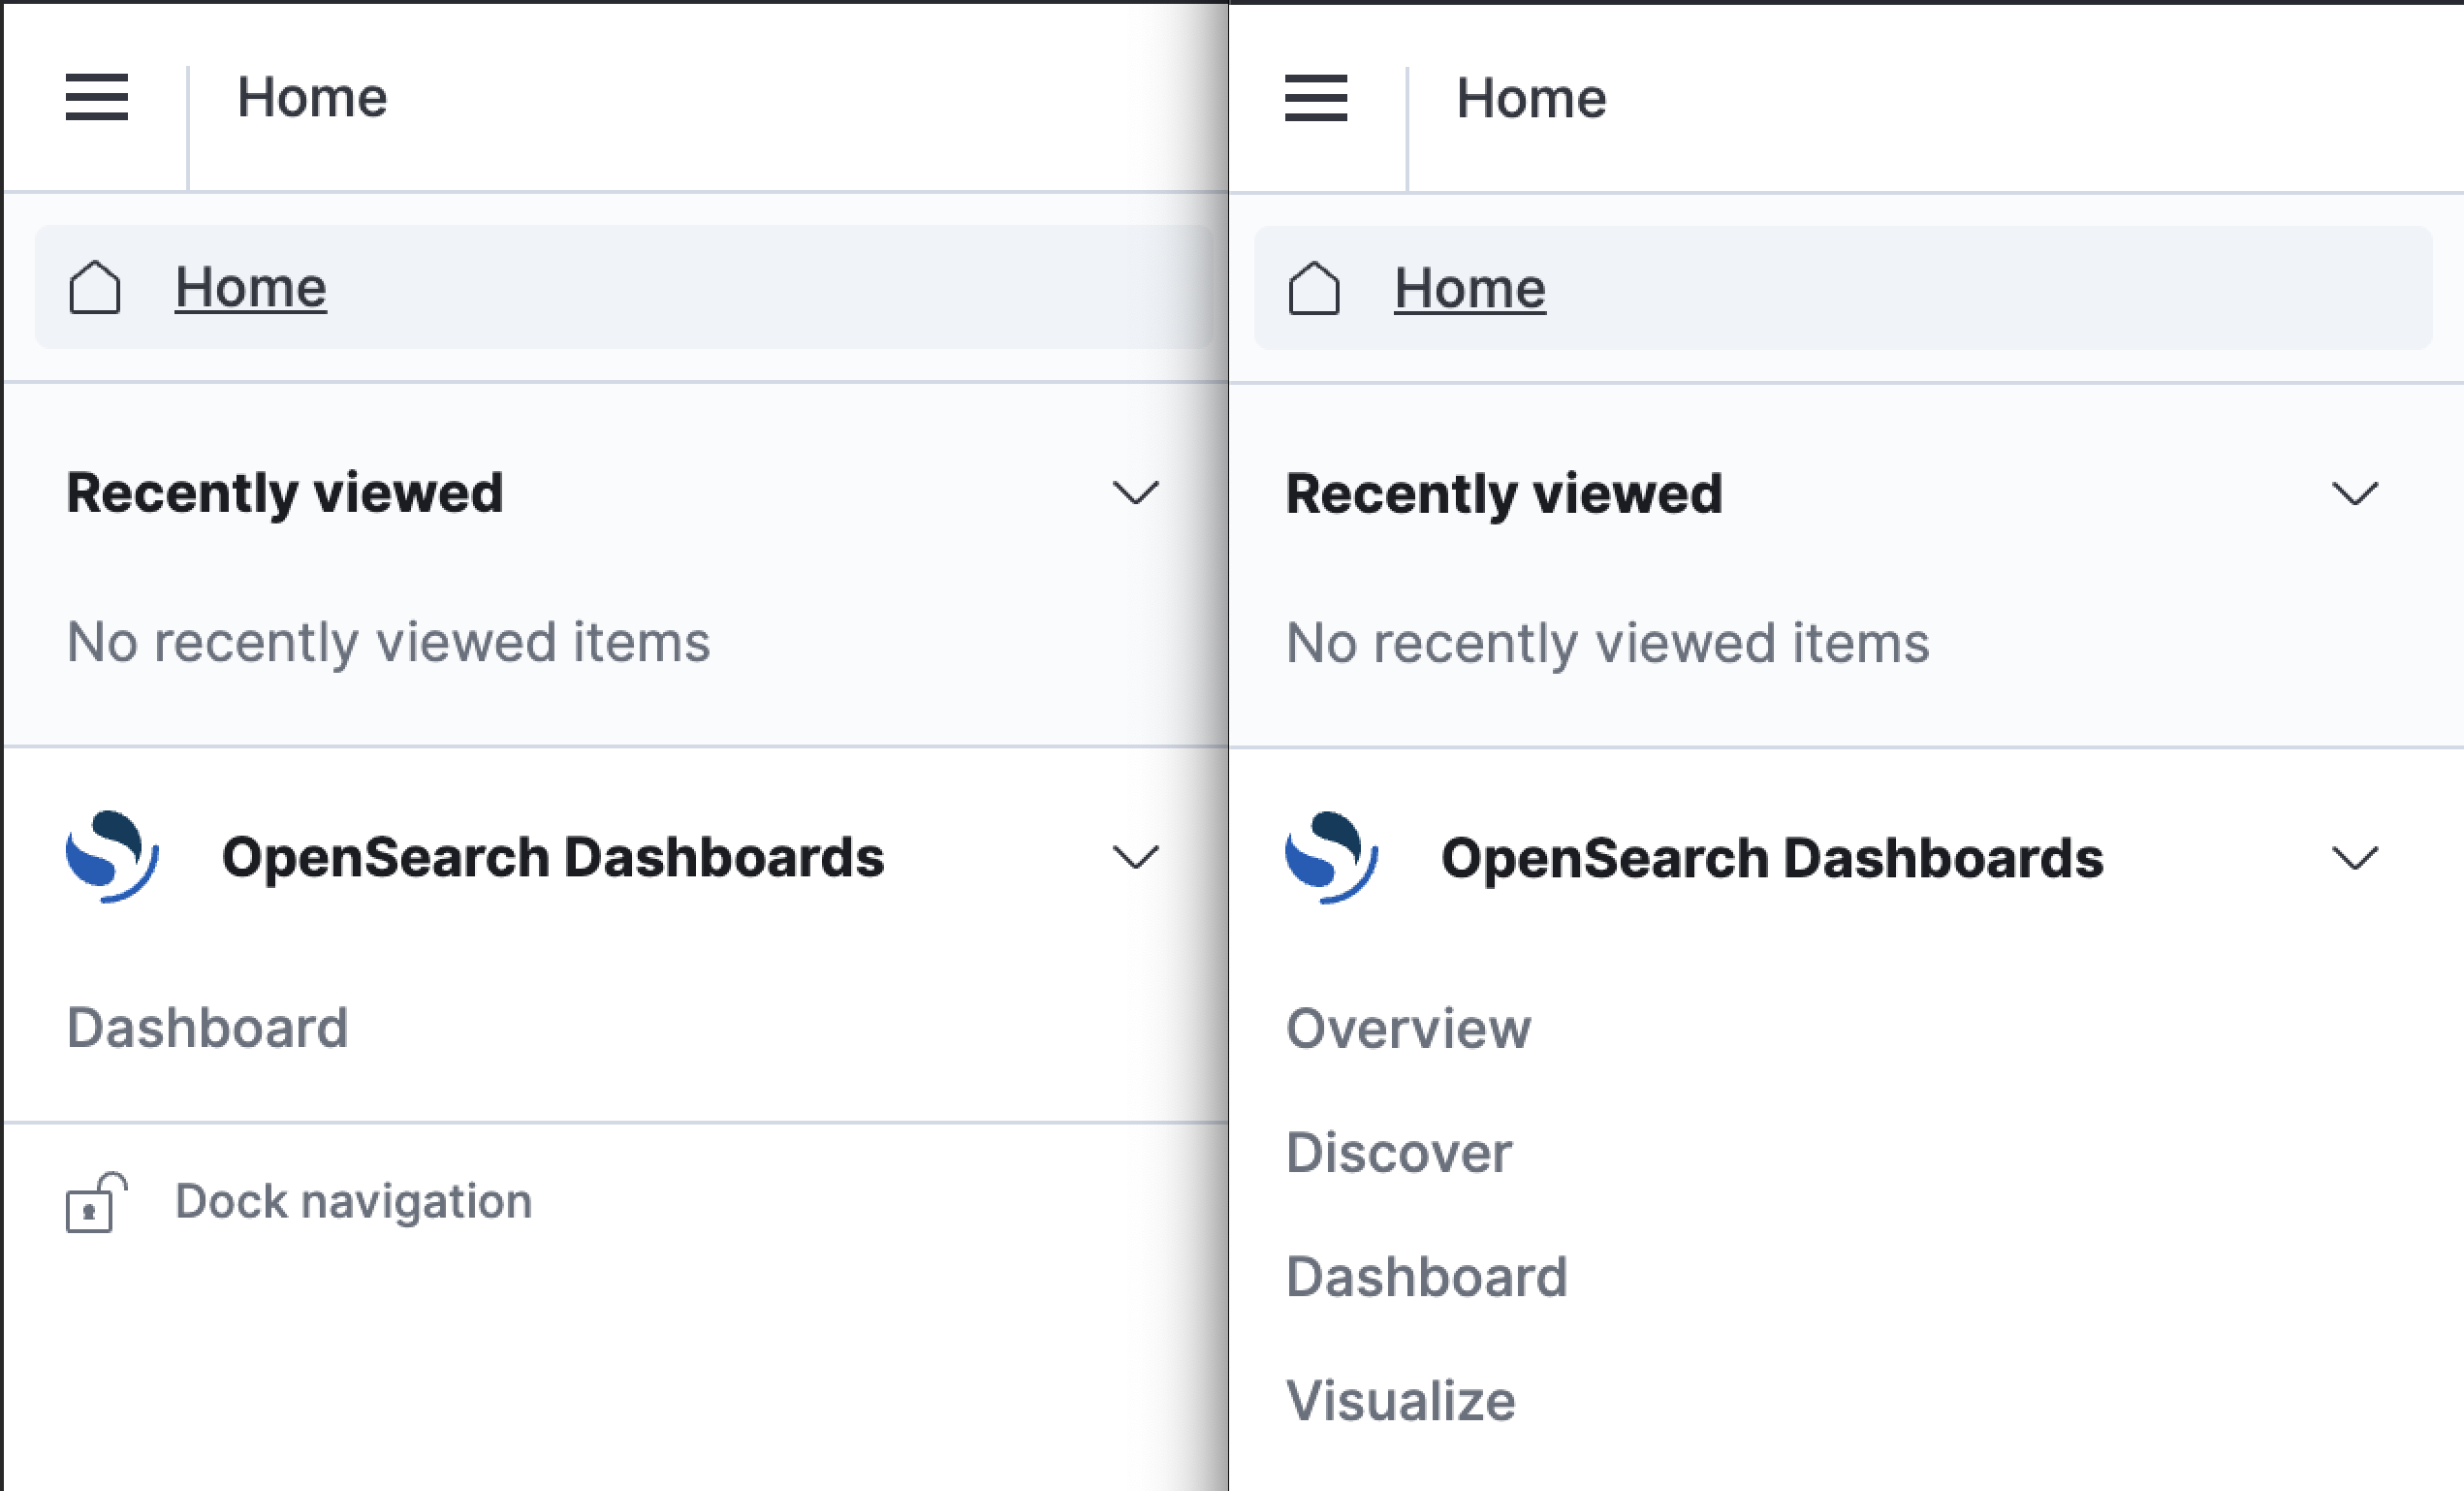
If a user is mapped to the readonly_mode role, all other elements of the UI will be removed, except for Dashboards. In the following image, the view on the left shows the screen from the perspective of a user mapped to a readonly_mode role. The view on the right shows a user’s standard view.
Mapping a user to only the readonly_mode role does not allow them to view relevant indexes or existing dashboards. Read access to indexes and dashboards requires separate permissions.
If a user is also mapped to any role listed under plugins.security.restapi.roles_enabled in opensearch.yml, for example, all_access or security_rest_api_access, then readonly_mode is ignored, giving them access to the standard UI elements.
Additional permissions
If a user requires permissions in addition to those included in the read_only role, such as for alerting or anomaly detection tasks, you can assign predefined roles, such as alerting_read_access or anomaly_read_access.
Predefined roles
The Security plugin includes several predefined roles that serve as useful defaults.
Built-in roles
The following table lists built-in static roles that are always provided.
| Role | Description |
|---|---|
all_access | Superuser role with full cluster access. Grants permissions to perform all cluster operations, write to all indexes, and access all tenants. |
kibana_server | The role used by the OpenSearch Dashboards server user to read/write its internal saved objects and system indexes. Don’t assign to human users. |
kibana_user | Lets a user sign in and use OpenSearch Dashboards. Grants permissions for cluster read and search, index monitoring, and writing to OpenSearch Dashboards indexes. Combine with read permissions for your data. |
logstash | Grants Logstash the permissions it needs to interact with OpenSearch. |
manage_snapshots | Grants permissions to manage snapshot repositories and run snapshot and snapshot restore operations. |
own_index | Grants each user full access to the user’s own index (named after the user). Useful for personal workspaces or multi-tenant environments. |
readall | Grants read and search permissions, such as calling _search and _msearch APIs, for all indexes in the cluster. |
readall_and_monitor | Grants the same permissions as readall, with additional cluster monitoring permissions (for example, viewing cluster health and statistics). |
For a detailed breakdown of the individual permissions for these roles, see static_roles.yml.
Demo roles
The following table lists the demo roles that are created by default if the roles.yml file is not provided when initializing the Security plugin.
| Role | Description |
|---|---|
alerting_ack_alerts | Grants permissions to view and acknowledge alerts but not to modify destinations or monitors. |
alerting_full_access | Grants full permissions to perform all alerting actions. |
alerting_read_access | Grants permissions to view alerts, destinations, and monitors, but not to acknowledge alerts or modify destinations or monitors. |
anomaly_full_access | Grants full permissions to perform all anomaly detection actions. |
anomaly_read_access | Grants permissions to view detectors but not to create, modify, or delete detectors. |
asynchronous_search_full_access | Grants full permissions to perform all asynchronous search actions. |
asynchronous_search_read_access | Grants permissions to view asynchronous searches but not to submit, modify, or delete them. |
cross_cluster_replication_follower_full_access | Grants full access to perform cross-cluster replication actions on the follower cluster. |
cross_cluster_replication_leader_full_access | Grants full access to perform cross-cluster replication actions on the leader cluster. |
index_management_full_access | Grants full permissions to perform all index management actions, including ISM, transforms, and rollups. |
ml_full_access | Grants full permissions to use all machine learning (ML) features, including starting tasks and managing models. |
ml_read_access | Grants permissions to view ML configuration, stats, models, and tasks without modifying them. |
notifications_full_access | Grants full permissions to perform all Notifications actions. |
notifications_read_access | Grants permissions to view Notifications configuration/channels and features but not modify them. |
point_in_time_full_access | Grants full permissions to perform all Point-in-Time operations. |
reports_instances_read_access | Grants permissions to generate on-demand reports and download existing report instances but not to view/create report definitions. |
security_analytics_ack_alerts | Grants permissions to view and acknowledge Security Analytics alerts. |
security_analytics_full_access | Grants full permissions to use all Security Analytics functionality. |
security_analytics_read_access | Grants permissions to view Security Analytics detectors, alerts, findings, mappings, and rules. |
snapshot_management_full_access | Grants full permissions to perform all snapshot management actions (including repositories and snapshots). |
snapshot_management_read_access | Grants permissions to view snapshot management policies, repositories, and snapshots without modifying them. |
For a breakdown of individual permissions assigned to each role, see roles.yml.
Example
The following tutorial describes the steps for creating a bulk access role in OpenSearch Dashboards.
Create a new bulk_access role:
- Open OpenSearch Dashboards.
- Choose Security, Roles.
- Create a new role named
bulk_access. - For Cluster permissions, add the
cluster_composite_opsaction group. - For Index Permissions, add an index pattern. For example, you might specify
my-index-*. - For index permissions, add the
writeaction group. - Choose Create.
Map the role to your user:
- Choose the Mapped users tab and Manage mapping.
- For Internal users, add your bulk access user.
- Choose Map.
Admin and super admin roles
OpenSearch user roles are essential for controlling access to cluster resources. Users can be categorized as regular users, admin users, or super admin users based on their access rights and responsibilities.
For more information about defining users, see Defining users. For more information about defining roles, see Defining roles.
Regular users
Regular users have basic access permissions that allow them to interact with the OpenSearch cluster, such as querying data and using dashboards, but they do not have administrative privileges.
Admin users
Admin users have elevated permissions that allow them to perform various administrative tasks within the cluster. They have broader access compared to regular users, including permissions to:
- Manage users and roles.
- Configure permissions.
- Adjust backend settings.
Admin users can perform these tasks by configuring settings in the opensearch.yml file, using OpenSearch Dashboards, or interacting with the REST API. For more information about configuring users and roles, see predefined roles.
Super admin users
Super admin users have the highest level of administrative authority within the OpenSearch environment. This role is typically reserved for select users and should be managed carefully.
Super admin users have unrestricted access to all settings and data within the cluster, including permissions to:
- Modify Security plugin configurations.
- Access and manage the security index
.opendistro_security. - Override any security limitations.
Authentication of the super admin role
Super admin users are authenticated through certificates, not passwords. The necessary certificates are defined in the admin_dn section of the opensearch.yml file and must be signed with the same root certificate authority (CA), as shown in the following example:
YAML
plugins.security.authcz.admin_dn:
- CN=kirk,OU=client,O=client,L=test, C=de
If the super admin certificate is signed by a different CA, then the admin CA must be concatenated with the node’s CA in the file defined in plugins.security.ssl.http.pemtrustedcas_filepath in opensearch.yml.
For more information, see Configuring super admin certificates.