JSON Web Token
JSON Web Tokens (JWTs) are JSON-based access tokens that assert one or more claims. They are commonly used to implement single sign-on (SSO) solutions and fall in the category of token-based authentication systems. The basic information-transmission and identity-verification lifecycle for a JWT is described in the following steps:
- A user logs in to an authentication server by providing credentials (for example, a username and password).
- The authentication server validates the credentials.
- The authentication server creates an access token and signs it.
- The authentication server returns the token to the user.
- The user stores the access token.
- The user sends the access token alongside every request to the service that it wants to use.
- The service verifies the token and grants or denies access.
- With granted access, the user has access until the expiration time of the token. The expiration time is typically set by the issuer in the token’s payload.
A JWT is self-contained in the sense that it carries within it all of the information necessary to verify a user. The tokens are base64-encoded, signed JSON objects.
JWT elements
JWTs consist of three parts:
- Header
- Payload
- Signature
Header
The header contains information about the signing mechanism being used, including the algorithm used for encoding the token. The following example shows typical properties and values for the header:
{
  "alg": "HS256",
  "typ": "JWT"
}
In this case, the header states that the message was signed using the hashing algorithm HMAC-SHA256.
Payload
The payload of a JWT contains the JWT claims. A claim is a piece of information about a user of the token that serves as a unique identifier. This allows the issuer of the token to verify identity. Claims are name-value pairs, and a payload typically includes multiple claims. While the options for adding claims are numerous, it is a good practice to avoid adding too many and making the payload excessively large, which would defeat the purpose of the JWT being compact.
There are three types of claims:
- Registered claims are defined by the JWT specification and comprise a set of standard claims with reserved names. Some examples of these claims include token issuer (iss), expiration time (exp), and subject (sub).
- Public claims, on the other hand, are defined at the will of the parties sharing the token. They can contain arbitrary information, such as the username and the roles of the user. As a precaution, the specification advises either registering the name or, at least, ensuring that the name is collision resistant with other claims.
- Private claims provide another option for assigning custom information to the payload: for example, an email address. As such, they are also referred to as custom claims. The two parties sharing the token must agree on their use because they are considered to be neither registered nor public claims.
The following example shows these JSON properties as name-value pairs:
{
  "iss": "example.com",
  "exp": 1300819380,
  "name": "John Doe",
  "roles": "admin, devops"
}
Signature
The issuer of the token generates the token’s signature by applying a cryptographic hash function to the base64-encoded header and payload. The client receiving the JWT decrypts and validates this signature in the final step of transmission.
These three parts—header, payload, and signature—are concatenated using periods to form a complete JWT:
encoded = base64UrlEncode(header) + "." + base64UrlEncode(payload)
signature = HMACSHA256(encoded, 'secretkey');
jwt = encoded + "." + base64UrlEncode(signature)
Example:
eyJhbGciOiJIUzI1NiIsInR5cCI6IkpXVCJ9.eyJsb2dnZWRJbkFzIjoiYWRtaW4iLCJpYXQiOjE0MjI3Nzk2Mzh9.gzSraSYS8EXBxLN_oWnFSRgCzcmJmMjLiuyu5CSpyHI
Configuring JWTs
If you use a JWT as your only authentication method, disable the user cache by setting the plugins.security.cache.ttl_minutes property to 0. For more information about this property, see opensearch.yml.
Set up an authentication domain and choose jwt as the HTTP authentication type. Because the tokens already contain all required information to verify the request, challenge must be set to false and authentication_backend to noop:
jwt_auth_domain:
  http_enabled: true
  transport_enabled: true
  order: 0
  http_authenticator:
    type: jwt
    challenge: false
    config:
      signing_key: "base64 encoded key"
      jwt_header: "Authorization"
      jwt_url_parameter: null
      subject_key: null
      roles_key: null
      required_audience: null
      required_issuer: null
      jwt_clock_skew_tolerance_seconds: 20
  authentication_backend:
    type: noop
The following table lists the configuration parameters.
| Name | Description |
|---|---|
signing_key | The signing key(s) used to verify the token. If you use a symmetric key algorithm, this is the Base64-encoded shared secret. If you use an asymmetric algorithm, the algorithm contains the public key. To pass multiple keys, use a comma-separated list or enumerate the keys. |
jwt_header | The HTTP header in which the token is transmitted. This is typically the Authorization header with the Bearer schema,Authorization: Bearer <token>. Default is Authorization. Replacing this field with a value other than Authorization prevents the audit log from properly redacting the JWT header from audit messages. It is recommended that users only use Authorization when using JWTs with audit logging. |
jwt_url_parameter | If the token is not transmitted in the HTTP header but rather as an URL parameter, define the name of the parameter here. |
subject_key | The key in the JSON payload that stores the username. If not set, the subject registered claim is used. To extract a username from nested JWT claims, you can configure subject_key as a list. |
roles_key | The key in the JSON payload that stores the user’s roles. The value must be a comma-separated list of roles. You can configure roles_key as a list to extract roles from nested JWT claims. |
required_audience | The name of the audience that the JWT must specify. You can set a single value (for example, project1) or multiple comma-separated values (for example, project1,admin). If you set multiple values, the JWT must have at least one required audience. This parameter corresponds to the aud claim of the JWT. |
required_issuer | The target issuer of JWT stored in the JSON payload. This corresponds to the iss claim of the JWT. |
jwt_clock_skew_tolerance_seconds | Sets a window of time, in seconds, to compensate for any disparity between the JWT authentication server and OpenSearch node clock times, thereby preventing authentication failures due to the misalignment. Security sets 30 seconds as the default. Use this setting to apply a custom value. |
Because JWTs are self-contained and the user is authenticated at the HTTP level, no additional authentication_backend is needed. Set this value to noop.
Symmetric key algorithms: HMAC
Hash-based message authentication codes (HMACs) are a group of algorithms that provide a way of signing messages by means of a shared key. The key is shared between the authentication server and the Security plugin. It must be configured as a base64-encoded value in the signing_key setting:
jwt_auth_domain:
  ...
    config:
      signing_key: "a3M5MjEwamRqOTAxOTJqZDE="
      ...
Asymmetric key algorithms: RSA and ECDSA
RSA and ECDSA are asymmetric encryption and digital signature algorithms that use a public/private key pair to sign and verify tokens. This means that they use a private key for signing the token, while the Security plugin needs to know only the public key to verify it.
Because you cannot issue new tokens with the public key—and because you can make valid assumptions about the creator of the token—RSA and ECDSA are considered to be more secure than HMAC.
To use RS256, you need to configure only the (non-base64-encoded) public RSA key as the signing_key in the JWT configuration:
jwt_auth_domain:
  ...
    config:
      signing_key: |-
        -----BEGIN PUBLIC KEY-----
        MIGfMA0GCSqGSIb3DQEBAQUAA4GNADCBiQK...
        -----END PUBLIC KEY-----
      ...
The Security plugin automatically detects the algorithm (RSA/ECDSA). If necessary, you can break the key into multiple lines.
Bearer authentication for HTTP requests
The most common way of transmitting a JWT in an HTTP request is to add it as an HTTP header with the bearer authentication schema:
Authorization: Bearer <JWT>
The default name of the header is Authorization. If required by your authentication server or proxy, you can also use a different HTTP header name using the jwt_header configuration key.
As with HTTP basic authentication, you should use HTTPS instead of HTTP when transmitting JWTs in HTTP requests.
Query parameters for HTTP requests
Although the most common way to transmit JWTs in HTTP requests is to use a header field, the Security plugin also supports parameters. Configure the name of the GET parameter using the following key:
    config:
      signing_key: ...
      jwt_url_parameter: "parameter_name"
      subject_key: ...
      roles_key: ...
As with HTTP basic authentication, you should use HTTPS instead of HTTP.
Validated registered claims
The following registered claims are validated automatically:
- “iat” (Issued At) Claim
- “nbf” (Not Before) Claim
- “exp” (Expiration Time) Claim
Supported formats and algorithms
The Security plugin supports digitally signed, compact JWTs with all standard algorithms:
HS256: HMAC using SHA-256
HS384: HMAC using SHA-384
HS512: HMAC using SHA-512
RS256: RSASSA-PKCS-v1_5 using SHA-256
RS384: RSASSA-PKCS-v1_5 using SHA-384
RS512: RSASSA-PKCS-v1_5 using SHA-512
PS256: RSASSA-PSS using SHA-256 and MGF1 with SHA-256
PS384: RSASSA-PSS using SHA-384 and MGF1 with SHA-384
PS512: RSASSA-PSS using SHA-512 and MGF1 with SHA-512
ES256: ECDSA using P-256 and SHA-256
ES384: ECDSA using P-384 and SHA-384
ES512: ECDSA using P-521 and SHA-512
Using a JWKS endpoint to validate a JWT
Validating the signature of the signed JWT is the last step in granting user access. OpenSearch validates the signature when the client sends the JWT with a REST request. The signature is verified in every authentication request.
Rather than store the cryptographic key used for validation in the local config.yml file’s authc section, you can specify a JSON Web Key Set (JWKS) endpoint to retrieve the key from its location on the issuer’s server. This method of validating the JWT can help streamline management of public keys and certificates.
For more information about the content and format of JSON Web Keys, see JSON Web Key (JWK) format.
Configuring JWKS endpoints for JWT authentication
You can configure JWKS endpoints directly in the JWT authentication domain. This approach provides enhanced security through automated key rotation and dynamic key management:
jwt_auth_domain:
  description: "Authenticate via JSON Web Token"
  http_enabled: true
  transport_enabled: true
  order: 0
  http_authenticator:
    type: jwt
    challenge: false
    config:
      jwks_uri: "https://example.com/.well-known/jwks.json"
      signing_key: null  # Not used when jwks_uri is specified
      jwt_header: "Authorization"
      jwt_url_parameter: null
      jwt_clock_skew_tolerance_seconds: 30
      roles_key: "roles"
      subject_key: "sub"
  authentication_backend:
    type: noop
JWKS configuration parameters
The following table describes the JWKS-specific configuration parameters.
| Name | Description | Default |
|---|---|---|
jwks_uri | The JWKS endpoint URL. When specified, signing_key is ignored and keys are retrieved from this endpoint. | null |
(Advanced) Security protection
To protect against denial-of-service (DoS) attacks and ensure secure JWKS operations, the Security plugin provides several protective measures, including request limits, timeouts, and response size restrictions. The following table describes the available settings for securing JWKS operations.
| Name | Description | Default |
|---|---|---|
max_jwks_keys | The maximum number of keys to process from the JWKS response. Set to -1 for unlimited. | -1 |
jwks_request_timeout_ms | The maximum amount of time allowed for a single HTTP request to the JWKS endpoint, in milliseconds. | 5000 |
jwks_queued_thread_timeout_ms | The maximum amount of time a request can wait in the queue before being processed, in milliseconds. | 2500 |
max_jwks_response_size_bytes | The maximum size of JWKS endpoint responses, in bytes. | 1048576 (1 MB) |
refresh_rate_limit_count | The maximum number of JWKS refresh requests allowed within the time window. | 10 |
refresh_rate_limit_time_window_ms | The time window for rate limiting JWKS refresh requests, in milliseconds. | 10000 (10 seconds) |
JWT header with Key ID
When using JWKS, your JWT header must include a key ID (kid) that identifies the specific key to use for verification:
{
  "alg": "RS256",
  "typ": "JWT",
  "kid": "V-diposfUJIk5jDBFi_QRouiVinG5PowskcSWy5EuCo"
}
The kid parameter is required when using JWKS endpoints and must match a key identifier in the JWKS response.
Example JWKS response
The JWKS endpoint must return a JSON object containing an array of public keys. Each key must include metadata such as the key type (kty), usage (use), key ID (kid), and algorithm (alg):
{
  "keys": [
    {
      "kty": "RSA",
      "use": "sig",
      "kid": "V-diposfUJIk5jDBFi_QRouiVinG5PowskcSWy5EuCo",
      "alg": "RS256",
      "n": "nCJ9ve8zRv_4pdSja5i_8GgozoVZrUocD6UnMyQmh6fRBZWspoIRSGdTjcKktevnKWXlg7mqe7FIx6CdVqR5rVfM0o61_7cgxJqdNdnCXsFR8_S_98qMIJ-gxmlwE2a1X1VrCSmYh60APUGoGypm0sAsjvYTzU04LTN7K0Gip3H5qpkFD-Mxlev75WeC8WrvsfUFl6XN1h55HZW2wlYJGmbFVQx5839d8o6BxDVvQrGdN8MzLRFTMG8wiPhVDQL5NHt3vKgDnD6zT0c_S5Kz42i4bcktRRoAbR3LjDn5YbAatmfKzwOuL0XsbEnn-kgnt2aJ5GCaggukY3mMc-Bhew",
      "e": "AQAB"
    }
  ]
}
Caching and performance
JWKS responses are cached to optimize performance:
- Initial cache: When JWKS is enabled, the system caches the JWKS endpoint response.
- Cache refresh triggers in the following situations:
- When a JWT contains a
kidnot found in the cache - When cache entries expire based on HTTP cache headers
- During background refresh cycles
- When a JWT contains a
- Rate limiting: Prevents excessive requests to the JWKS endpoint (by default, 10 requests per 10-second window).
Backward compatibility
JWT authentication supports direct JWKS endpoint configuration starting with OpenSearch 3.3. The feature maintains full backward compatibility:
- When
jwks_uriis not specified or set tonull, the system uses the existing staticsigning_keymechanism. - Existing JWT configurations continue to work without modification.
- You can switch between static keys and JWKS by updating the configuration.
- When both
jwks_uriandsigning_keyare configured,jwks_uritakes precedence andsigning_keyis ignored.
Using JWT with Teleport
You can use JWT tokens issued by Teleport to authenticate users in OpenSearch Dashboards. This integration maps Teleport roles to OpenSearch backend roles for access control.
Teleport configuration
In Teleport, you need to create a role that has the same name as a backend role from your OpenSearch instance:
apiVersion: resources.teleport.dev/v1
kind: TeleportRoleV7
metadata:
  name: admin # Match Opensearch "Backend roles" names
spec:
  allow:
    # App
    app_labels_expression: |
      regexp.match(labels["hostname"], "^(.*)opensearch(.*)$")
Then apply this role to users you want to use the role.
OpenSearch Dashboards configuration
To configure OpenSearch for using Teleport, perform these actions.
Teleport configuration
In the agent configuration file (typically located at /etc/teleport.yaml), configure the application service to automatically include the JWT in a request header:
# [...]
app_service:
  enabled: "yes"
  apps:
  - name: opensearch-dashboard
    uri: "https://127.0.0.1:5601"
    insecure_skip_verify: true
    rewrite:
      headers:
      - "Authorization: {{internal.jwt}}"
    labels:
      # [...]
Then apply the new configuration by running this command:
systemctl restart teleport
OpenSearch Dashboards configuration
In the OpenSearch Dashboards configuration file (typically located at /usr/share/opensearch-dashboards/config/opensearch_dashboards.yml), enable JWT authentication and retain basic HTTP authentication as a fallback method:
opensearch_security.auth.multiple_auth_enabled: true
opensearch_security.auth.type: ["basicauth", "jwt"]
Then apply the new configuration by running this command:
systemctl restart dashboards
Security node configuration
On the node where you run the securityadmin.sh script, update the security plugin configuration file (for example, /usr/share/opensearch/config/opensearch-security/config.yml) to configure both authentication methods:
_meta:
  type: "config"
  config_version: 2

config:
  dynamic:
    authc:
      basic_internal_auth_domain:
        description: "Authenticate via HTTP Basic against internal users database"
        http_enabled: true
        transport_enabled: true
        order: 1
        http_authenticator:
            type: basic
            challenge: true
        authentication_backend:
            type: internal

      jwt_auth_domain:
        description: "Authenticate via Json Web Token provide by Teleport"
        http_enabled: true
        transport_enabled: true
        order: 0
        http_authenticator:
            type: jwt
            challenge: false
            config:
                signing_key: null
                jwks_uri: "https://example.com/.well-known/jwks.json" # URL of the Teleport's leaf the machine is in, not the root
                jwt_header: "Authorization"
                jwt_url_parameter: null
                jwt_clock_skew_tolerance_seconds: 30
                subject_key: "sub"
                roles_key: "roles"
        authentication_backend:
            type: noop
Ensure that the basic authentication is configured using order: 1 and challenge: true and that the JWT authentication is configured using order: 0 and challenge: false. Otherwise, direct API calls will fail unless the JWT header is explicitly included.
To apply the new configuration, run the following command:
export JAVA_HOME="[OPENSEARCH_INSTALL_DIR]/jdk"

bash [OPENSEARCH_INSTALL_DIR]/plugins/opensearch-security/tools/securityadmin.sh \
-cacert [PATH_TO_ROOT_CA] \
-cert [PATH_TO_ADMIN_CERT_PEM] \
-key [PATH_TO_ADMIN_CERT_KEY] \
-cd [PATH_TO_OPENSEARCH_SECURITY_CONFIG_DIR] \
-nhnv -icl \
-h 127.0.0.1
Using JWT authentication with gRPC
Introduced 3.5
JWT authentication is supported over the gRPC transport. The gRPC transport shares the same authentication domains as the HTTP layer, so JWT tokens are validated against the same authentication backend configuration. You can provide the same JWT headers over gRPC as you would when using the REST API.
When transmitting JWTs over gRPC, you must enable TLS. For information about configuring TLS for gRPC, see Configuring TLS certificates for gRPC.
Note the following limitations:
- Superuser authentication (client certificate authentication) is not supported over gRPC. Configuration changes requiring superuser privileges must use the REST API.
- Anonymous authentication is not supported over gRPC. Requests with anonymous authentication headers are rejected as unauthorized.
Troubleshooting common issues
This section details how to troubleshoot common issues with your security configuration.
Verify correct claims
Ensure that the JWT token contains the correct iat (issued at), nbf (not before), and exp (expiry) claims, all of which OpenSearch validates automatically.
JWT URL parameter
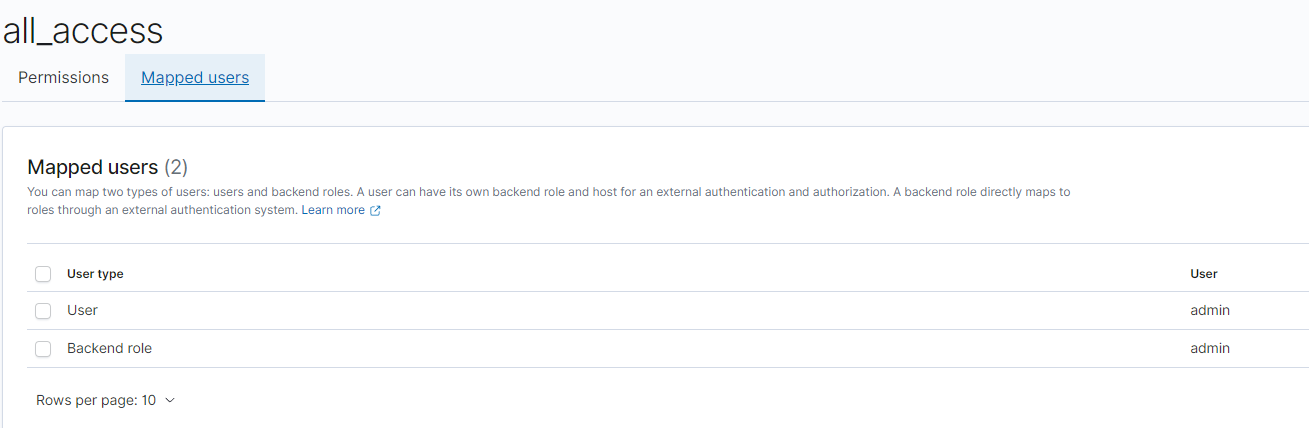
When using the JWT URL parameter containing the default admin role all_access (for example, curl http://localhost:9200?jwtToken=<jwt-token>), the request fails and throws the following error:
{
   "error":{
      "root_cause":[
         {
            "type":"security_exception",
            "reason":"no permissions for [cluster:monitor/main] and User [name=admin, backend_roles=[all_access], requestedTenant=null]"
         }
      ],
      "type":"security_exception",
      "reason":"no permissions for [cluster:monitor/main] and User [name=admin, backend_roles=[all_access], requestedTenant=null]"
   },
   "status":403
}
To correct this, ensure that the role all_access is mapped directly to the internal user and not to a backend role. To do this, navigate to Security > Roles > all_access and select the Mapped users tab. Select Manage mapping and add “admin” to the Users section.

The user should then appear on the Mapped Users tab.
OpenSearch Dashboards configuration
Even though JWT URL parameter authentication works when querying OpenSearch directly, it fails when used to access OpenSearch Dashboards.
Solution: Ensure the following lines are present in the opensearch_dashboards.yml configuration file:
opensearch_security.auth.type: "jwt"
opensearch_security.jwt.url_param: <your-param-name-here>