Using the time filter
The time filter is located at the top of the Dashboard, Discover, and Visualize applications.
Use the time filter to select the time interval for the data that is displayed in the applications. The filter supports intervals in seconds, minutes, hours, days, weeks, months, or years.
This page uses the terms time range and time interval interchangeably to refer generically to a filter interval, no matter what the magnitude, from seconds to years. Time or time value refers to the endpoint of a relative time interval in seconds, minutes, or hours, as distinct from date values in days, weeks, months, or years.
You can select a relative time interval (a fixed window of time relative to now), or an absolute time interval (between two fixed times). A refresh interval determines how often a relative time interval refreshes. The refresh interval is configurable, and defaults to one second (1 s). Absolute time intervals are unaffected by the refresh interval.
While most applications (data logs, for example), deal with past dates and times, relative and absolute time intervals can encompass both past and future dates and times. For example, a relative time interval could be set to span now to 24 hours in the future.
The default time range is a relative interval of Last 15 minutes. You can change the default at Dashboards Management > Advanced Settings > Time filter defaults, or select a time range at the application level as described in Selecting a time range.
Navigating the time filter

The following components make up the time filter.
- The shortcut selector (A) opens a dialog from which you can select a relative time interval or a recently used time interval, and set the time refresh interval.
- The time range display (B) shows the selected time range in absolute (for example, Mar 22, 2024 @12:00:01.000 → now) or relative (for example, Last 2 years) terms.
- The Show dates link (C) forces the time range display to show the time interval in from → to format.
- The Refresh button (D) updates the data displayed in the application based on new filter or query values. Refresh updates query and data filters as well as the time filter.
Selecting a time range
You can select a relative or absolute interval as the time range at the application level. Or, you can select a relative or absolute interval using the shortcut selector.
Selecting an absolute time interval
To select an absolute time interval, follow these steps:
-
If necessary to display the interval in from → to form, select Show dates.
-
Select the displayed start time.
-
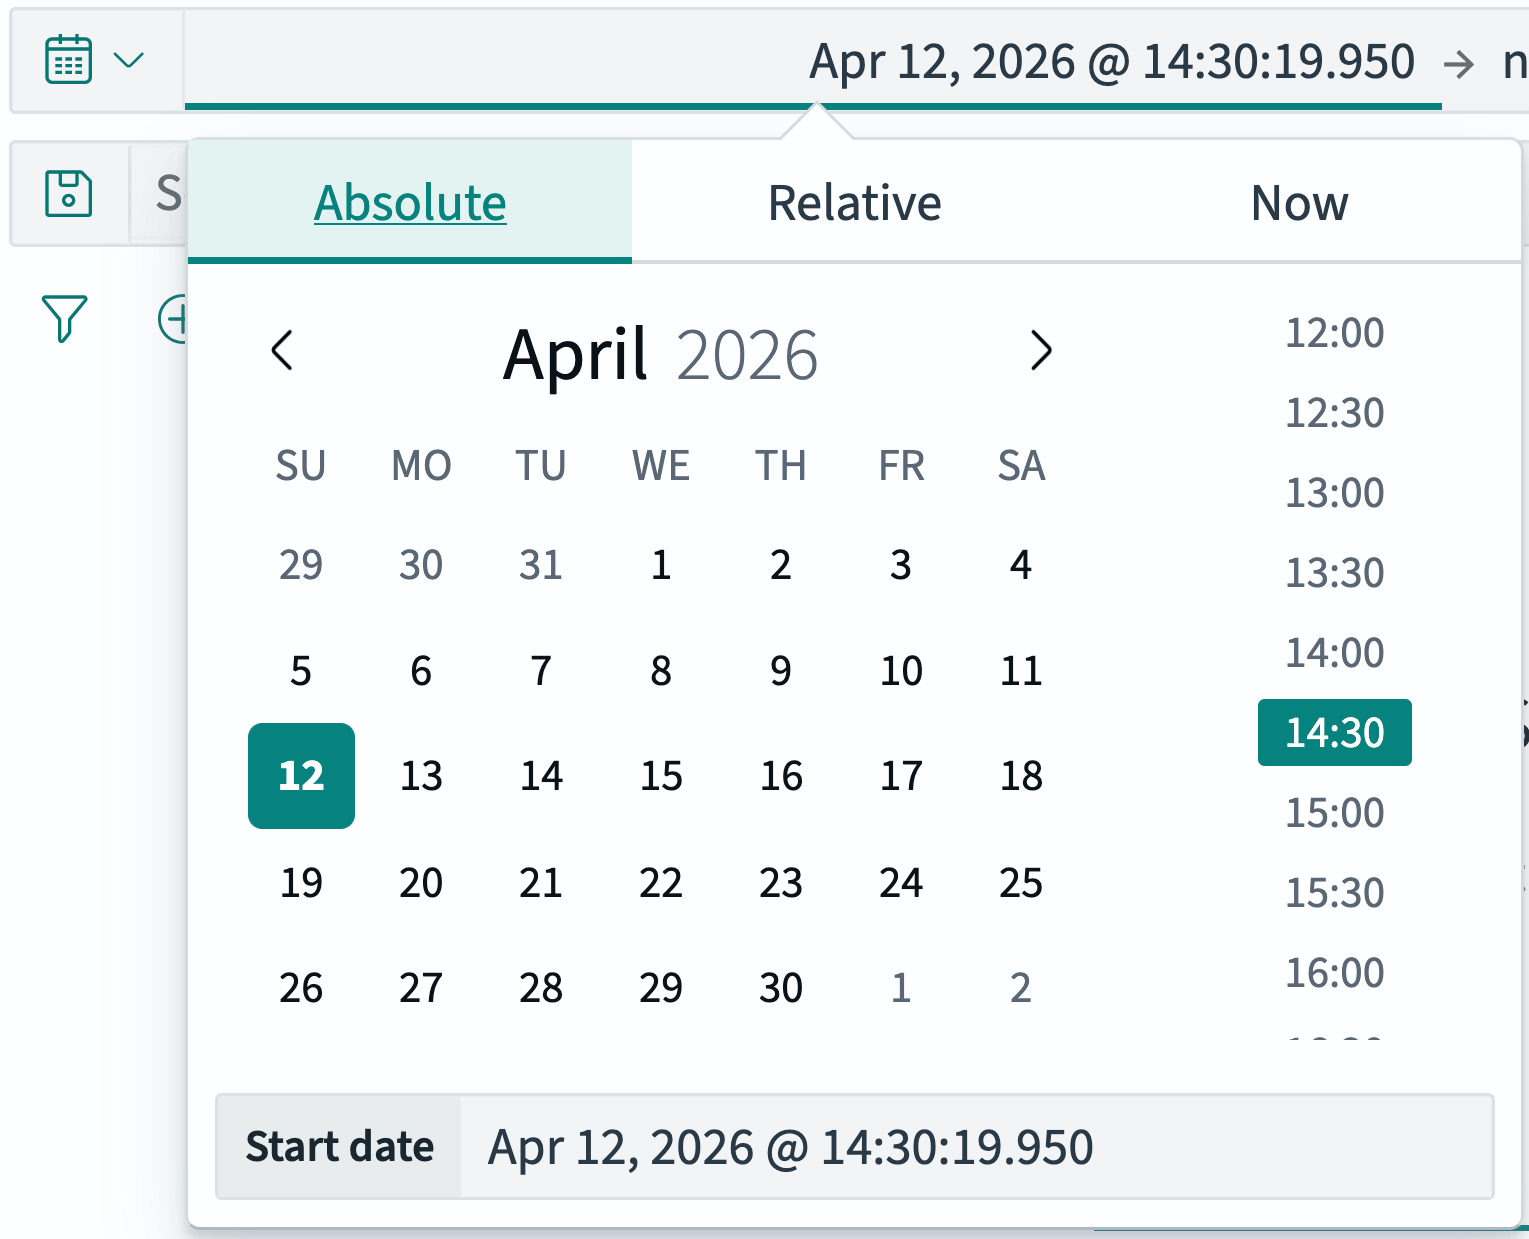
In the time selection popover, choose the Absolute tab as shown in the following image.
-
Use the calendar and time scroll tools to choose a start time, or edit the start time in the Start date text box.
-
Select the displayed end time.
-
In the time selection popover, choose the Absolute tab.
-
Use the calendar and time scroll tools to choose an end date and time, or edit the end date and time in the End date text box.
-
Choose the Update button to apply changes.
The data tables and visualizations displayed in the application automatically updates to reflect the new time interval filter.
Selecting a relative time interval
To select a relative time interval, follow these steps:
-
If necessary to display the interval in from → to form, select Show dates.
-
Select the displayed start time.
-
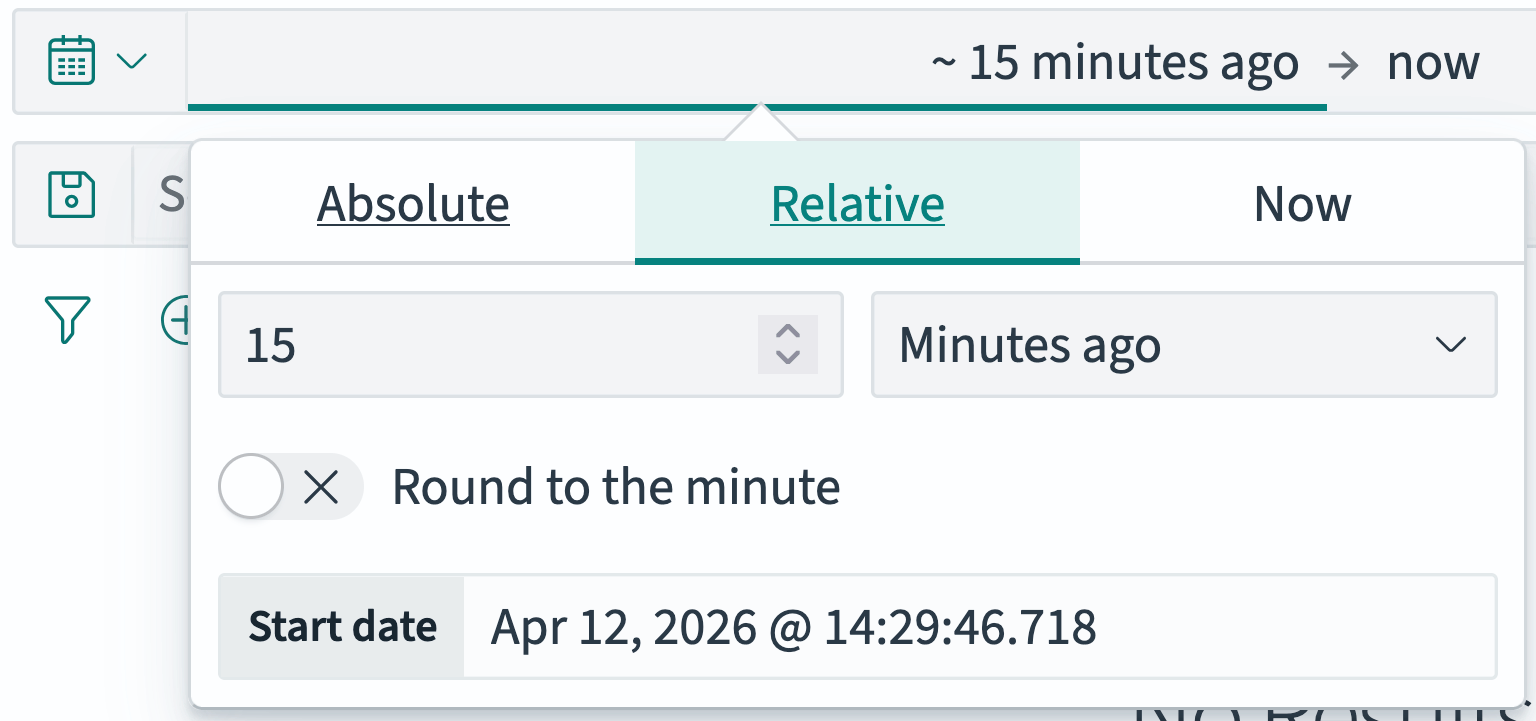
In the time selection popover, choose the Relative tab as shown in the following image.
-
In the number combo box, select or enter the interval quantity.
-
In the interval dropdown, select the past (ago) or future (from now) start of the relative interval.
You can choose Now as the start time. In this case, the relative end time must be in the future (from now).
-
(Optional) Activate the Round to toggle. This rounds the start time to the beginning of the specified interval rather than calculating it as an offset from the exact time on the system clock.
-
Select the displayed end time.
-
Do one of the following:
Many, perhaps most, applications require a relative interval ending at the present. In this case, do the immediately following instructions.
-
Select the Now tab.
-
In the Now popover, select Set end date and time to now.
If your application requires a relative end time that is not now, do the following:
-
In the time selection popover, choose the Relative tab.
-
In the number combo box, select or enter the interval quantity.
-
In the interval dropdown, select the past (ago) or future (from now) start of the relative interval.
The end time must be after the start time. The interval displays in red if the interval is illegal.
-
(Optional) Activate the Round to … toggle. This rounds the start time to the beginning of the specified interval rather than calculating it from the exact time on the system clock.
-
-
Choose the Update button to apply changes.
The application updates the data in data tables and visualizations to reflect the new time interval filter.
Using the time interval shortcuts
To select a time interval from common or previous interval values, follow these steps:
-
Select the
 (calendar) or
  (clock) icon on the right of the search bar.
 -
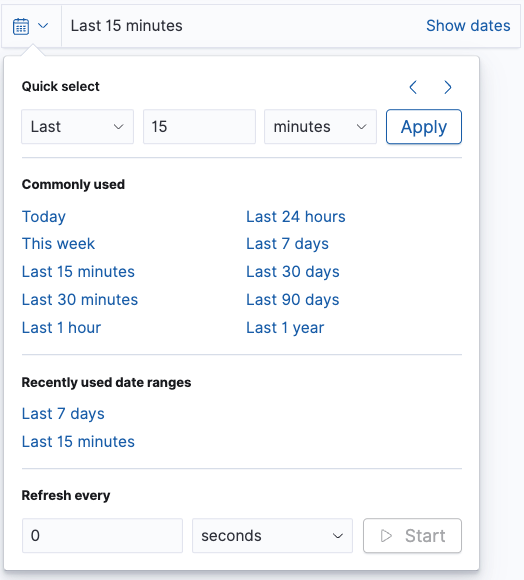
From the shortcut popover, select one of the time filter options, as shown in the following image.
-
Quick select: Choose an interval spanning now to a past (Last) or future (Next) time.
-
In the Last/Next dropdown, select Last (past) or Next (future).
-
In the number combo box, select or enter the interval quantity.
-
In the interval dropdown, select the units for the relative interval.
-
Choose Apply.
-
-
Commonly used: Choose a common time range, for example Today, Last 7 days, or Last 30 days.
-
Recently used date ranges: Select a previously used time range. The time range can be relative or absolute.
-
-
(Optional) Change the refresh interval:
-
In the Refresh every panel, select or enter the interval quantity in the number combo box.
-
In the interval dropdown, select the interval unit (seconds, minutes, or hours).
-
Select Refresh.
-
Starting and stopping data refresh
To start or stop the time interval refresh, follow these steps:
-
From an OpenSearch Dashboards application (Discover, Dashboards, or Visualize), select the
(calendar) or (clock) icon on the right of the search bar. -
In the Refresh every panel, select Start or Stop.
-
If the time interval is relative:
- Starting data refresh causes the data selection to be updated approximately every refresh interval.
- Stopping data refresh “freezes” the selection interval until data refresh is restarted.
-
If the time interval is absolute, then starting or stopping data refresh has no effect on the data selection.
-
-
Select Refresh.
The shortcut selector shows the
(calendar) icon if the time interval refresh is stopped, or the (clock) icon if the time interval refresh is running.
Configuring the time zone
By default, the time filter uses the time zone detected by your browser. To change the time zone, go to Dashboards Management > Advanced settings and update the Timezone for date formatting (dateFormat:tz) setting. For more information, see Advanced settings.