Index maintenance
OpenSearch refreshes indexes, flushes the translog, and merges segments in the background, so most clusters never need these operations to be run by hand. Run them yourself when you need a result at a specific moment: making a document searchable immediately after indexing it, reclaiming disk space from deleted documents before a snapshot, or changing the shard count of an index that has outgrown its original layout.
Each operation is available through the index operations APIs and, except for cloning, from the Index Management page in OpenSearch Dashboards.
For lifecycle operations such as creating, opening, closing, and deleting an index, see Index operations.
The examples on this page operate on an index named logs-2026 with two primary shards, which you can create with the following request:
PUT /logs-2026
{
  "settings": {
    "index.number_of_shards": 2,
    "index.number_of_replicas": 0
  }
}
Refreshing an index
A refresh writes the documents in the in-memory buffer to a new segment, making them visible to search. OpenSearch refreshes each index every second by default, so a document becomes searchable about a second after you index it. Refresh an index manually when a test or a client needs to search a document immediately after writing it:
POST /logs-2026/_refresh
Refreshing creates a segment each time it runs, so refreshing frequently during a bulk load slows indexing. When you load a large amount of data, set index.refresh_interval to -1 for the duration of the load and refresh once at the end. For more information, see Refresh index.
A refresh applies only to open indexes.
Flushing an index
A flush performs a Lucene commit, writing the segments in the file system cache to disk and starting a new translog. This is what makes indexed data durable across a node restart. OpenSearch flushes automatically based on translog size and age:
POST /logs-2026/_flush
Flush manually before you shut a node down for maintenance so that recovery does not have to replay a large translog. For more information, see Flush.
A flush applies only to open indexes.
Clearing an index cache
OpenSearch caches field data, query results, and request-level aggregation results to speed up repeated searches. Clearing these caches frees heap memory but makes the next searches slower until the caches refill:
POST /logs-2026/_cache/clear
To clear one cache instead of all of them, use the fielddata, query, or request query parameter. For more information, see Clear cache.
Clearing a cache applies only to open indexes.
Force merging an index
OpenSearch stores an index as a set of immutable segments and merges smaller segments into larger ones in the background. A deleted document is only marked as deleted; its space is reclaimed when the segment containing it is merged. A force merge runs that merge immediately, reducing the segment count and expunging deleted documents:
POST /logs-2026/_forcemerge?max_num_segments=1
Force merging is expensive in I/O and can produce segments that the automatic merge policy never merges again. Run it only on indexes that no longer receive writes, such as a rolled-over time-series index. For more information, see Force merge.
Shrinking an index
Shrinking copies an index into a new index with fewer primary shards. Shrink an index that was created with more shards than its final size warrants, because the number of primary shards of an existing index cannot be changed in place.
First, block write operations on the source index. Shrinking an index that still accepts writes fails with an illegal_state_exception:
PUT /logs-2026/_settings
{
  "index.blocks.write": true
}
Then shrink the index:
POST /logs-2026/_shrink/logs-2026-shrunk
{
  "settings": {
    "index.number_of_shards": 1
  }
}
The source index must meet the following conditions:
- The index is read-only, with a write block set. See Blocks.
- A copy of every shard, primary or replica, resides on the same node. Use shard allocation filtering to move the copies together.
- Every shard of the source index is allocated, that is, the index health is not red.
- The target index does not already exist.
- The source index has more primary shards than the target index, and the target shard count is a factor of the source shard count. For example, an index with 8 primary shards can be shrunk to 4, 2, or 1. An index with a prime number of shards, such as 7, can be shrunk only to 1.
- No single target shard receives more than 2,147,483,519 documents, which is the maximum a Lucene shard can hold.
- The node performing the shrink has enough free disk space for a second copy of the index.
For more information, see Shrink index.
Splitting an index
Splitting copies an index into a new index with more primary shards, dividing each source shard into several target shards. Split an index that has outgrown its original shard count and needs more capacity for data volume or query load. Splitting also requires a write block on the source index:
PUT /logs-2026/_settings
{
  "index.blocks.write": true
}
Then split the index:
POST /logs-2026/_split/logs-2026-split
{
  "settings": {
    "index.number_of_shards": 4
  }
}
The source index must meet the following conditions:
- The index is read-only, with a write block set. See Blocks.
- Every shard of the source index is allocated, that is, the index health is not red.
- The target index does not already exist.
- The source index has fewer primary shards than the target index, and the target shard count is a multiple of the source shard count. For example, an index with 2 primary shards can be split into 4, 6, or 8. An index with 1 primary shard can be split into any number of shards.
- The node performing the split has enough free disk space for a second copy of the index.
For more information, see Split index.
Cloning an index
Cloning copies an index into a new index with the same number of primary shards, mappings, and settings. Clone an index to test a mapping or settings change against real data without touching the original. Like shrinking and splitting, cloning requires a write block on the source index:
PUT /logs-2026/_settings
{
  "index.blocks.write": true
}
Then clone the index:
POST /logs-2026/_clone/logs-2026-copy
Remove the write block when you are finished by setting index.blocks.write to false.
For more information, see Clone index. Cloning is available only through the API.
Rolling over an index
A rollover creates a new index and redirects the write alias or data stream to it, so that writes continue against a fresh index while the previous one becomes read-only. This keeps individual time-series indexes at a manageable size and lets you delete or archive old data by dropping whole indexes.
A rollover target must be a data stream or an index alias with a designated write index. Create an index whose name ends in a number and point a write alias at it:
PUT /logs-000001
{
  "aliases": {
    "logs": {
      "is_write_index": true
    }
  }
}
The following request rolls over the logs alias when its write index reaches 50 GB, 10 million documents, or 7 days of age:
POST /logs/_rollover
{
  "conditions": {
    "max_size": "50gb",
    "max_docs": 10000000,
    "max_age": "7d"
  }
}
None of the conditions are met on a new index, so the response reports "rolled_over": false. For more information, see Roll over index.
To roll over on a schedule instead of calling the API when a condition is met, define an Index State Management policy with a rollover action. ISM evaluates the conditions for you and rolls the index over when they are met.
Index maintenance in OpenSearch Dashboards
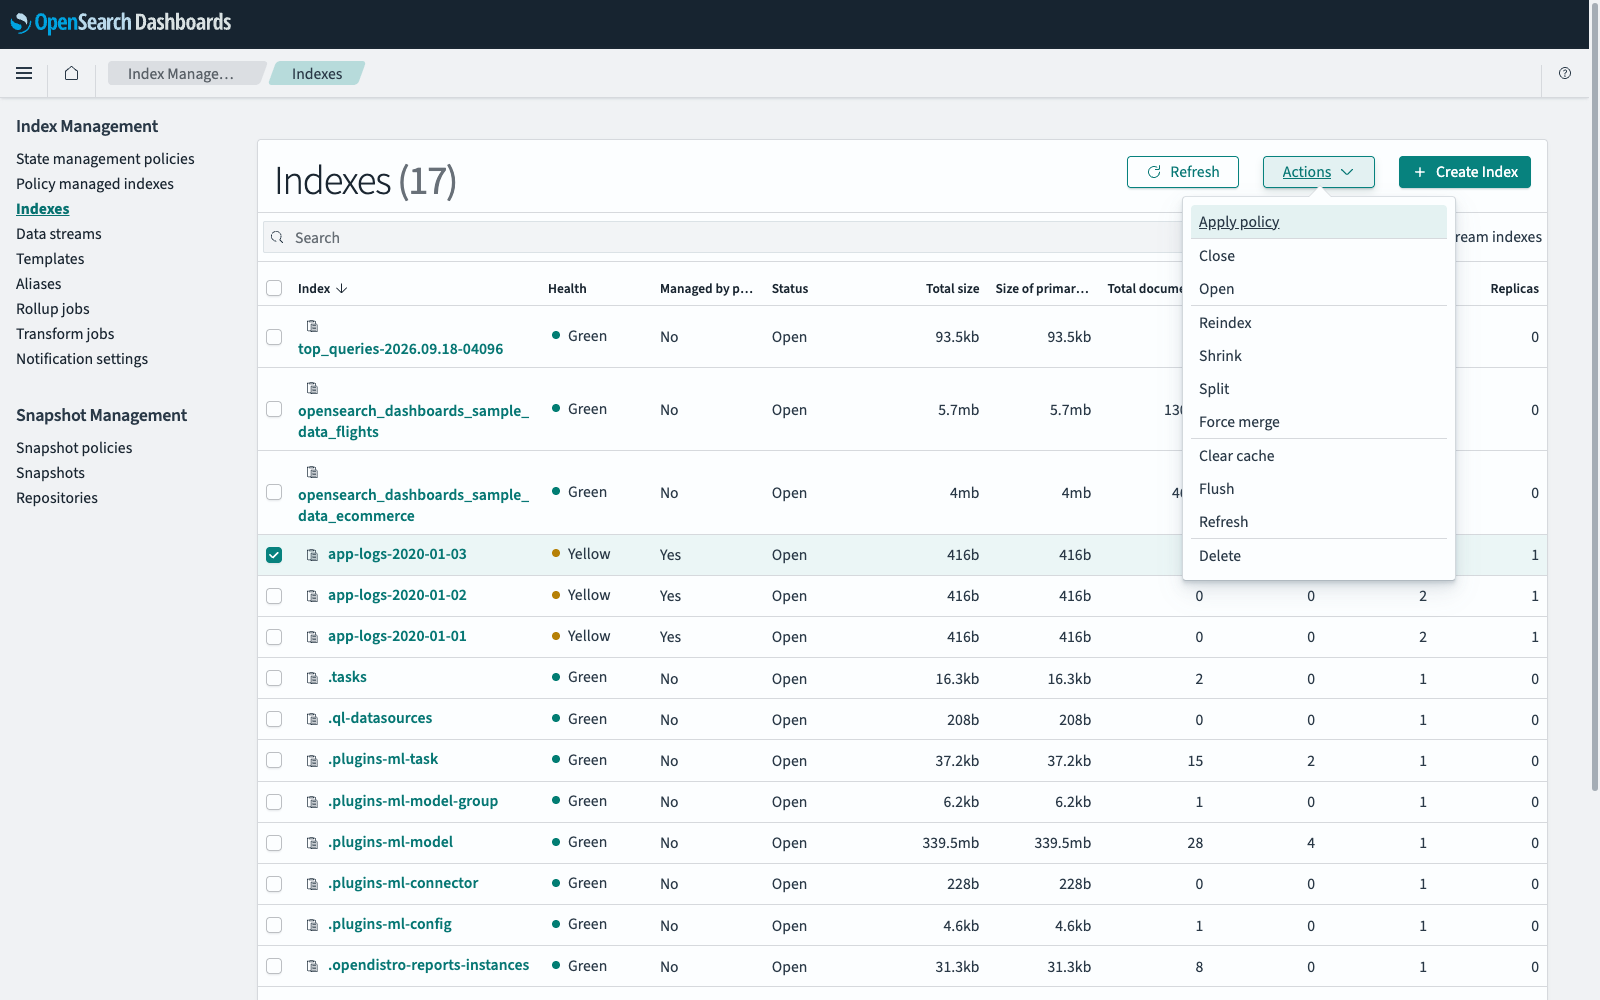
To navigate to the Index Management page, go to Management > Index Management on the top menu. The maintenance operations for the selected indexes are in the Actions menu on the Indexes page, as shown in the following image.
These procedures act on an index that already exists. To create one, see Creating an index.
Refreshing, flushing, or clearing the cache
- In Index Management, select Indexes, Data streams, or Aliases.
- Optionally, select the checkbox next to each item that you want the operation to apply to. If you do not select any, the operation applies to all of them.
- Select Actions, and then select Refresh, Flush, or Clear cache.
- Select the same option in the confirmation dialog.
For aliases and data streams, these operations apply to the open backing indexes.
Force merging an index
- In Index Management, select Indexes, Data streams, or Aliases.
- Select Actions, and then select Force merge.
- In Configure source index, select the indexes, data streams, or aliases to merge.
-
Optionally, expand Advanced settings and set any of the following options:
- To merge to a specific number of segments, select Manually set number of segments in Index segments and enter the number. Enter
1to merge each shard into a single segment. - To flush the indexes after the merge completes, select Flush indexes.
- To expunge the documents that are marked as deleted, select Remove deleted documents.
- To merge to a specific number of segments, select Manually set number of segments in Index segments and enter the number. Enter
- Optionally, in Notifications, select Has failed / timed out, Has completed, or both to be notified about the outcome.
- Select Force merge.
Shrinking an index
- In Index Management, select Indexes.
- Select the index to shrink, and then select Actions > Shrink.
- In Configure target index, enter a name in Target index name.
- Enter the new shard count in Number of primary shards and the replica count in Number of replicas.
- Optionally, select or enter one or more aliases for the target index in Index alias.
- Optionally, expand Advanced settings to add notifications. See Sending additional notifications.
- Select Shrink.
If the source index does not meet the conditions for shrinking, the interface prompts you to resolve them, including setting a write block on the index.
Splitting an index
- In Index Management, select Indexes.
- Select the index to split, and then select Actions > Split.
- In Configure target index, enter a name in Target index name.
- Enter the new shard count in Number of primary shards and the replica count in Number of replicas.
- Optionally, select or enter one or more aliases for the target index in Index alias.
- Optionally, expand Advanced settings to add notifications. See Sending additional notifications.
- Select Split.
Rolling over a data stream
- In Index Management, select Data streams.
- Select Actions, and then select Roll over.
- In Configure source, select the data stream to roll over.
- Select Roll over.
Rolling over an alias
- In Index Management, select Aliases.
- Select Actions, and then select Roll over.
- In Configure source, select the alias to roll over. If the alias has no write index, you are prompted to designate one.
- In Define index, enter a name for the new index and, optionally, an alias for it.
- In Index settings, enter the number of primary shards, the number of replicas, and the refresh interval.
- Select Roll over.
Checking the status of long-running operations
Reindex, shrink, and split operations can take from tens of seconds to hours, depending on the amount of data involved. Because each is a one-time, non-recursive operation, you can track it to completion:
- In Index Management, select Indexes.
- Find the index that the operation applies to.
- Read the Status column for the state of the operation.