Dashboard sections
Introduced 3.9
This is an experimental feature and is not recommended for use in a production environment. For updates on the progress of the feature or if you want to leave feedback, join the discussion on the OpenSearch forum.
Dashboard sections are collapsible containers that group visualization panels into named categories within a dashboard. Use sections to organize a dashboard that contains many panels and to reduce its initial load time by saving it with rarely used sections collapsed.
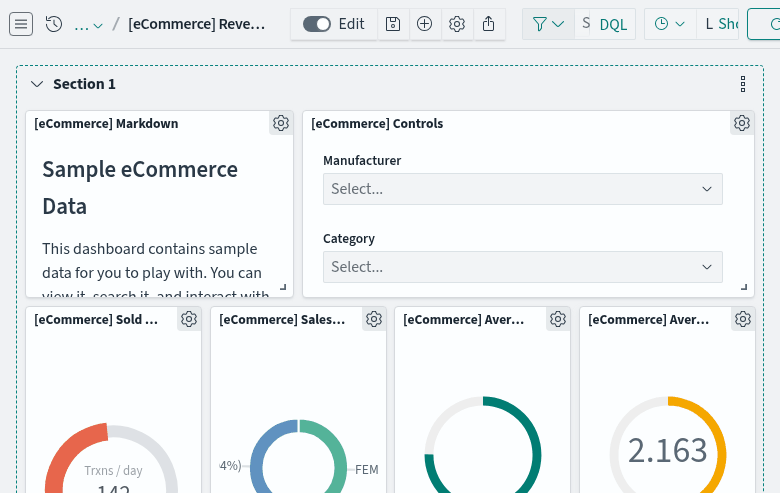
The following image shows a dashboard containing a section of visualizations.
Enabling dashboard sections
To enable dashboard sections, add the following settings to your opensearch_dashboards.yml file:
uiSettings.overrides.home:useNewHomePage: true
dashboard.allowDashboardSections: true
Then restart OpenSearch Dashboards for the changes to take effect.
Creating and managing sections
All section actions except collapsing and expanding require edit mode. In edit mode, select the  (vertical ellipsis) icon on a section header to open the section context menu, or the
  (gear) icon on a panel to open the panel context menu.
Within a section, panels have their own grid layout, so you can drag and resize them as you would on a dashboard without sections. The section adjusts its height to fit its contents.
Creating a section
When you create the first section on a dashboard, all existing panels are grouped into that section so that the current layout is preserved. Later sections start empty.
To create a section, follow these steps:
- Open a dashboard in edit mode.
- In the toolbar, select Add.
- Select Section.
A section is added to the dashboard.
Renaming a section
To rename a section, follow these steps:
- Select the (vertical ellipsis) icon on the section header.
- Select Rename.
- In the Rename section dialog, enter a name for the section.
- Select Save.
Section names do not need to be unique, but distinct names make it easier to move panels between sections.
Collapsing and expanding sections
To collapse a section, select the arrow to the left of the section title. The section header remains visible, and the panels are hidden. To expand a collapsed section, select the arrow again.
Reordering sections
To reorder sections, follow these steps:
- Select and hold the section header, which acts as the drag handle.
- Drag the section to a new position.
- Release the section to drop it into place.
Moving a panel to another section
You can move a panel from one section to another or from the Ungrouped area into a section.
To move a panel, follow these steps:
- Select the (gear) icon in the panel’s upper-right corner.
- Select Move to section.
- In the Move to section dialog, select the target section.
- Select Move.
The panel is removed from its current section and added to the target section.
Adding a new visualization to a section
To create a visualization and add it to a section, follow these steps:
- Select the (vertical ellipsis) icon on the section header.
- Select Create new visualization.
- Build the visualization in the visualization editor.
- Select Save and return.
The visualization is added to the section as a panel.
Adding a saved visualization to a section
To add an existing visualization from the library, follow these steps:
- Select the (vertical ellipsis) icon on the section header.
- Select Add from library.
- Search for and select a saved visualization.
The visualization is added to the section.
Deleting a section
To delete a section, follow these steps:
- Select the (vertical ellipsis) icon on the section header.
- Select Delete section.
- In the confirmation dialog, confirm the deletion.
Deleting a section permanently removes all panels in it. You cannot undo this after you save the dashboard. To keep the panels, move them to another section first.
Removing all sections
You can return all panels to a single grid and remove the section structure from the dashboard.
To remove all sections, follow these steps:
- Select the (vertical ellipsis) icon on any section header.
- Select Ungroup all sections.
- In the confirmation dialog, confirm the action.
All panels are returned to a single grid, and the sections are removed.
Ungrouped panels
Panels that are not assigned to a section appear in an Ungrouped area at the bottom of the dashboard. To move an ungrouped panel into a section, use Move to section in the panel context menu. You cannot move a panel back into the Ungrouped area.
Collapsed sections and data loading
Collapsing a section hides its panels but does not remove them. A panel that has not yet been displayed requests no data while its section is collapsed; it fetches data when you expand the section and scroll the panel into view. A panel that has already been displayed continues to refresh with the rest of the dashboard even while the section is collapsed.
On a dashboard with many visualizations, saving the dashboard with rarely used sections already collapsed reduces both the initial page load time and the load on your OpenSearch cluster.
Example: Organizing a dashboard into sections
To follow along, go to the OpenSearch Dashboards home page, select Add sample data, and then select Add data for Sample eCommerce orders.
The following steps organize the sample e-commerce dashboard into two sections:
- On the top menu, select Dashboards, and then select [eCommerce] Revenue Dashboard.
- Select the Edit toggle in the toolbar to enter edit mode.
- In the toolbar, select Add > Section. All existing panels are grouped into a section named Section 1.
- Select the (vertical ellipsis) icon on the Section 1 header, select Rename, enter
Revenue and trends, and then select Save. - In the toolbar, select Add > Section again. An empty section appears below the first one, also named Section 1 because the first section was renamed. Rename this section
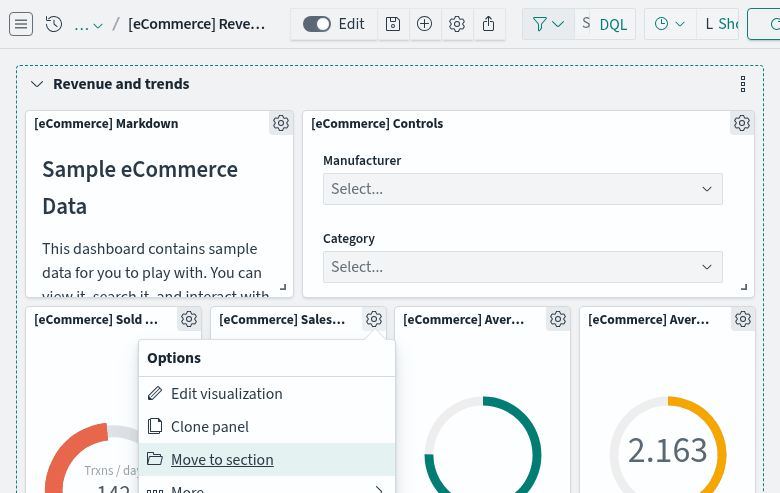
Customer breakdown. - On the [eCommerce] Sales by Gender panel, select the (gear) icon, and then select Move to section, as shown in the following image.
- In the Move to section dialog, select Customer breakdown, and then select Move.
- Repeat the previous two steps for the [eCommerce] Sales Count Map and [eCommerce] Top Selling Products panels.
- Select the arrow to the left of the Customer breakdown title to collapse the section.
- Select Save.
The dashboard now contains two sections that you can collapse, expand, and reorder independently, and the collapsed Customer breakdown section loads no data until you expand it.
Limitations
Dashboard sections have the following limitations:
- Dragging a panel from one section to another is not supported. To move a panel, use Move to section in the panel context menu.
- Section-scoped filters and variables are not supported. All filters apply to the entire dashboard.
- Adding, renaming, reordering, and deleting sections require edit mode. In view mode, you can only collapse and expand sections.